
Arrow Inserts, Outserts and Half-Outs Explained
What are arrow inserts? Standard, HIT, half-out and outsert systems, insert weights, FOC, which glue suits carbon or aluminium, and how to fit and remove them.

By Archery Insider Editorial Team
· 11 min read
In this article
Every arrow needs a way to hold its point. On most modern arrows, that job falls to a small component glued into, or over, the front of the shaft: an insert, a half-out or an outsert. These parts look minor, but they affect arrow weight, front-of-centre balance, broadhead alignment and how easily you can change points.
This guide explains what each type is, how much they weigh (with manufacturer figures), how they affect FOC, which glue to use for which shaft, how to install and remove them safely, and how they relate to broadhead alignment.
What are arrow inserts? The quick answer
An arrow insert is a small sleeve, usually aluminium, brass or steel, that's glued into the front of a hollow arrow shaft. It has a threaded hole for screw-in field points and broadheads. Without it, you'd have to glue points directly to the shaft, which makes swapping between practice points and broadheads impossible.
Inserts also reinforce the front of the shaft, let you add weight up front, and, in some designs, help line up broadheads with the shaft.
Types of point-end components
Standard (lipped) inserts
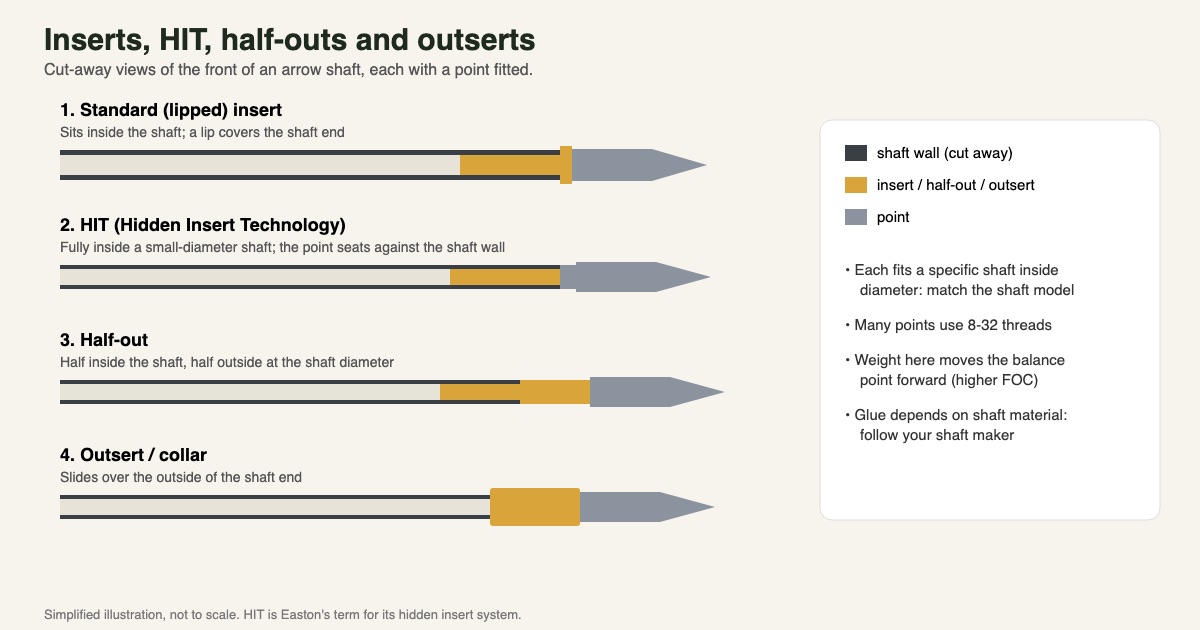
The traditional insert slides into the shaft, and a thin lip at the front sits against the cut end of the shaft. The point screws into the insert and seats against the lip. Standard inserts suit most standard-diameter carbon and aluminium arrows. Easton's .244 Aluminum Insert, for example, weighs 13 grains.
HIT (Hidden Insert Technology)
As arrow shafts got thinner, lipped inserts no longer suited them. Easton explains that its "patented HIT (Hidden Insert Technology) system was originally designed to fit next generation, small-diameter (ST or Slim Tech) arrows … standard, lipped inserts would no longer be compatible. HIT was engineered to fit up inside the arrow shaft, hidden from view."
The big advantage is alignment: "HIT gives automatic broadhead alignment because the broadhead shank aligns directly against the shaft wall." Easton's 5 mm HIT inserts weigh 16 grains, and the kits include an insert tool and a squaring stone (epoxy not included).
Half-outs
A half-out sits half inside the shaft and half outside, usually at the same diameter as the shaft. Because part of it is outside the shaft, it protects the front end and adds weight at the very front, which boosts FOC. Easton says its 5 mm Half-Out "delivers improved FOC versus conventional inserts."
Half-outs are common on small-diameter hunting arrows, and come in aluminium, stainless steel and titanium versions.
Outserts and collars
An outsert slides over the outside of the shaft instead of inside. It's typically used on very thin shafts where there's too little room for a strong insert, and it reinforces the front of the shaft. Related parts include HIT collars, which reinforce the front of a shaft fitted with a HIT insert, and broadhead adapter rings (see alignment below).
Materials and weights
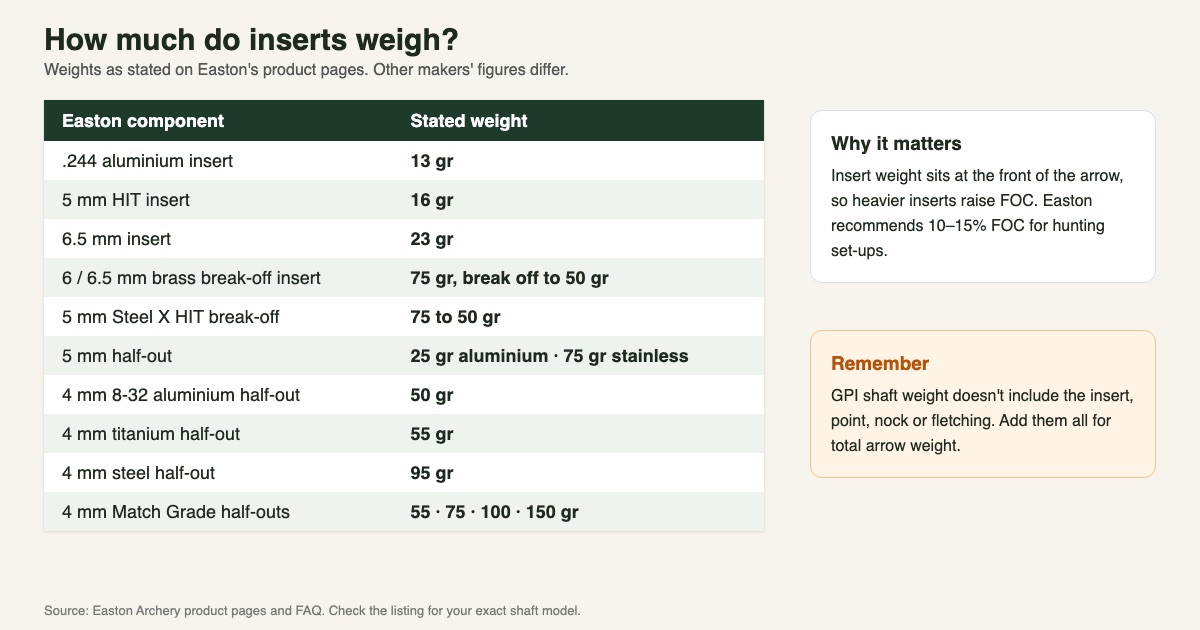
Insert weight matters because it sits at the very front of the arrow. These are weights as stated on Easton's product pages; other makers' figures differ.
| Easton component | Material | Stated weight |
|---|---|---|
| .244 Aluminum Insert | Aluminium | 13 gr |
| 5 mm HIT insert | See listing | 16 gr |
| 6.5 mm insert | See listing | 23 gr |
| 6 mm and 6.5 mm Brass break-off | Brass | 75 gr, break off to 50 gr |
| 5 mm Steel X HIT break-off | Steel | "Adjustable weight from 75-50 grains" |
| 5 mm Half-Out | Aluminium or stainless | 25 gr (aluminium), 75 gr (stainless) |
| 4 mm 8-32 Aluminum Half-Out | Aluminium | 50 gr |
| 4 mm Titanium Half-Out | Titanium | 55 gr |
| 4 mm Steel Half-Out | 416 stainless steel | 95 gr |
| 4 mm Match Grade half-outs | Aluminium, steel, titanium/steel | 55, 75, 100 and 150 gr |
Break-off inserts
Break-off inserts are a neat way to fine-tune weight. They come with extra sections you can snap off to reduce weight. Easton's 6 mm and 6.5 mm brass break-off inserts start at 75 grains and can be reduced to 50 grains. It's a useful way to fine-tune FOC or total arrow weight without changing points.
Aluminium vs brass vs steel vs titanium
- Aluminium: lightest, and the default in many arrows.
- Brass: heavier, used to add front weight, often as break-off inserts.
- Steel: heavier still and strong, used in some half-outs and HIT inserts.
- Titanium: strong and lighter than steel for a given size.
Material choice is mostly about weight and strength. We don't claim any material improves penetration by itself, because penetration depends on the whole arrow and broadhead.
Inserts and FOC
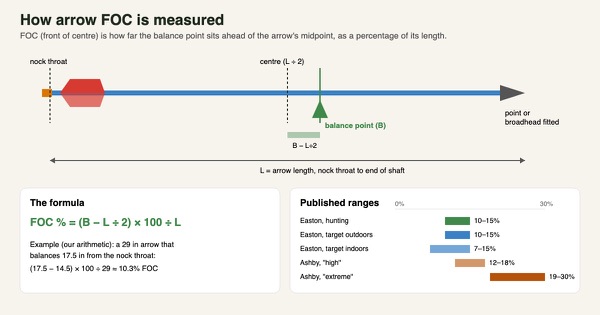
FOC (front of centre) describes balance. Easton defines it as "the percentage of the arrow's total weight that is located in the front half of the arrow," and "Easton recommends 10-15% FOC for hunting set ups."
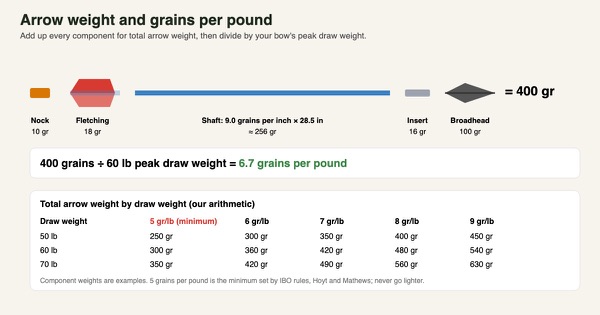
Because inserts sit right at the front, they're one of the easiest ways to adjust FOC. Swapping a 16-grain aluminium insert for a 75-grain brass one adds almost 60 grains up front, raising both FOC and total weight. Remember that a shaft's GPI rating "does not include the weight of the point, nock, insert or fletchings", so add all of them when working out total arrow weight.
Heavier front ends can also change how stiff the arrow behaves, so retune after big changes. Our guides to arrow FOC, arrow weight for hunting and kinetic energy and momentum go deeper.
Do arrow inserts need glue? Which glue for which shaft?
Yes: inserts and half-outs are glued in, and the right adhesive depends on your shaft. This is where makers disagree, so follow your shaft maker's instructions.
Aluminium and aluminium/carbon (A/C) shafts
Easton: "Easton Archery only recommends Easton hot melt for installing inserts into aluminum and A/C shafts. Super glue or quick-bonding glue may become brittle over time and could cause inserts to loosen or fallout."
Bohning's traditional hot melt, Ferr-L-Tite, is aimed at wood and aluminium and melts at "350° F (176.7°C)".
Carbon shafts
Here the two makers differ:
- Easton: "Because heat will damage the structure of carbon shafts and should always be avoided, Easton Archery does not recommend any type of hot melt glue for any carbon arrows." Easton recommends epoxy for its carbon components: for the 4 mm titanium half-out, "Easton's HIT Epoxy is recommended for installation", and for the 4 mm aluminium half-out, "Easton recommends using only 2-part Epoxy (avoid quick bond or CA adhesives)."
- Bohning: "We highly recommend Ferr-L-Tite Cool Flex for carbon shafts as it can be reversed without damaging your arrow." Cool Flex melts at "280°F (137.8°C)", and Bohning says to "just use HOT WATER for easy adjustment, replacement, or removal." But Bohning "DOES NOT recommend using Ferr-L-Tite with carbon shafts due to the amount of heat needed for reversal."
If your arrows are Easton carbon, follow Easton's advice; for other brands, check that maker's instructions. When in doubt, a two-part epoxy recommended by the shaft maker is the conservative choice, but remember that it's permanent.
Permanent vs reversible adhesives
Some adhesives are designed to come apart later and some aren't. Bohning notes that Insert Iron, Blazer Bond and Fletch Fuse "are not intended to be reversible – attempting to do so could damage your arrow." Insert Iron needs a cure of "48 hours (72 hours if air is dry…)". Choose a reversible adhesive if you expect to change insert weights; choose permanent if you never will.
How to install inserts
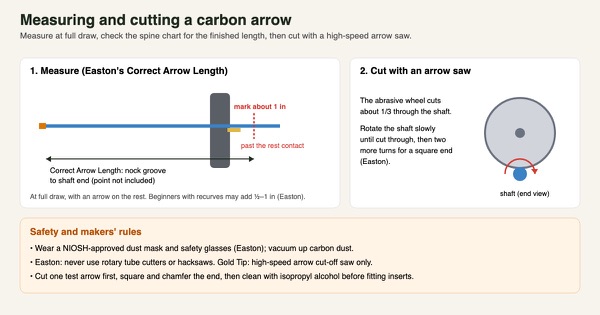
- Cut and square the shaft first. Our guide to cutting carbon arrows covers this, and how long should arrows be explains choosing the length.
- Clean inside the shaft. Easton: "After cutting your arrows to length, use a Q-tip with 91% isopropyl alcohol to clean the inside of the arrow where the insert or bushing is being installed." Bohning stresses cleaning with a cotton swab and denatured alcohol "until no traces of black residue remain."
- Let it dry fully.
- Apply adhesive to the insert (and inside the shaft if the adhesive maker says so).
- Insert while rotating. Bohning says to press the insert in "while rotating it one complete turn", which spreads the adhesive evenly.
- Seat it fully. Lipped inserts should sit flush against the shaft end. HIT kits include an insert tool for pushing them to the correct depth.
- Wipe off excess adhesive and let it cure for the full time on the label before screwing in points or shooting.
How to remove inserts without ruining the shaft
How you remove an insert depends on the adhesive used.
- Reversible hot melt on carbon (Cool Flex): Bohning says to "submerge the insert into the water for 10-15 seconds", using hot water to soften the adhesive, then remove the insert gently. It warns: "If removed with excessive force, you may inadvertently pull the carbon fibers from the shaft."
- Hot melt on aluminium: heat the insert or point to soften the glue, as the adhesive maker directs. Don't overheat aluminium.
- Epoxy and instant adhesives: these are generally permanent. Bohning warns that its non-reversible adhesives could damage your arrow if you try to remove them. The safest option may be to cut the shaft behind the insert, if the arrow can stay long enough, or to retire the arrow.
Safety: Bohning says to "always wear heat-resistant gloves and eye protection." Never use an open flame on carbon shafts, and remember that Easton advises against heat on carbon altogether.
Broadhead alignment and squaring
For broadheads to fly like field points, they need to sit straight on the shaft. Inserts play a big part.
- HIT alignment: Easton says HIT gives "automatic broadhead alignment because the broadhead shank aligns directly against the shaft wall."
- Broadhead adapter rings (BAR): Easton explains that these rings "are required for fixed broadheads that utilize the face of the insert to support or hold the blades in place … [and] for mechanical broadheads that use the insert as a stop for the blades." Check your broadhead's instructions.
- Squaring: a squaring tool or stone trues the front of the shaft and insert so the point seats evenly. Easton's HIT kits include a stone.
After building hunting arrows, spin each one with a broadhead fitted to check for wobble, and compare broadhead and field point impact. Our guides to field points vs broadheads and fixed-blade vs mechanical broadheads cover tuning and choice.
Do arrows come with inserts?
Often, but not always. Many arrows sold as finished, or "ready to shoot", come with inserts installed or included. Easton's 6.5 mm insert, for example, is "included when you purchase" its 6.5 Match Grade and Hunter Classic arrows. Bare shafts are often sold without them. Check the listing, and if you're buying inserts separately, match the insert to your shaft model: inserts are made for a specific inside diameter, so one model's insert won't fit another's.
For examples of finished arrows, see our Gold Tip Hunter XT review and Easton XX75 Jazz review. For material choice, see carbon vs aluminium arrows. Crossbow bolts use inserts too, with specific weight requirements from the crossbow maker; see crossbow bolts explained.
Insert buying checklist
- Match the shaft model and inside diameter.
- Choose the system: standard, HIT, half-out or outsert.
- Pick a weight to suit your FOC and total weight targets.
- Check the thread matches your points (8-32 is common).
- Check adhesive guidance from your shaft maker.
- Consider break-off inserts if you want to fine-tune weight.
- Check your broadhead needs adapter rings.
When you're ready, you can browse 8-32 arrow inserts or arrow insert epoxy on Amazon. For the whole arrow, see our guide to choosing arrows, and for the other end, how to fletch arrows.
Frequently asked questions
What are arrow inserts?
Small threaded sleeves glued into the front of an arrow shaft, so you can screw in field points and broadheads. They also add front weight and reinforce the shaft end.
Do arrow inserts need to be glued?
Yes. Use the adhesive your shaft maker recommends, and let it cure fully before shooting.
What glue should I use for arrow inserts?
For aluminium and A/C shafts, Easton recommends its hot melt. For carbon, Easton recommends no hot melt (it uses epoxy), while Bohning recommends its low-temperature Cool Flex hot melt. Follow your shaft maker's advice.
Can arrow inserts be removed?
If they were installed with a reversible adhesive, yes, with gentle heat as the adhesive maker directs. Epoxy and instant adhesives are generally permanent. Removing inserts by force can pull carbon fibres from the shaft.
What's the difference between an insert and an outsert?
An insert fits inside the shaft; an outsert fits over the outside of it. Half-outs sit in between: half inside, half outside.
Brass or aluminium inserts for hunting?
That depends on your weight and FOC goals. Brass is heavier and raises FOC; aluminium is lighter. Easton recommends 10 to 15% FOC for hunting setups, so choose the insert that gets your arrow there with your chosen point.
Do arrows come with inserts?
Many finished arrows do; bare shafts often don't. Check the listing and match any separate inserts to your shaft model.
What are HIT inserts?
Easton's Hidden Insert Technology: inserts that fit fully inside small-diameter shafts, with the broadhead shank aligning against the shaft wall for automatic alignment.
Related articles
 Guides
Arrow FOC Explained: Front of Center for Hunting Arrows
What arrow FOC (front of center) is, how to measure and calculate it, Easton's recommended ranges, how to raise or lower it, and the high-FOC debate.
October 27, 2026 · 9 min read
 Guides
Arrow Weight for Hunting: Grains per Pound Explained
Arrow weight for hunting explained: what grains per pound means, the 5 GPP minimum, a weight table by draw weight, light vs heavy arrows, and starting points.
October 27, 2026 · 10 min read
 Training
How to Cut Carbon Arrows Safely at Home
How to cut carbon arrows safely: measuring the right length, what Easton and Gold Tip say about tools, carbon dust safety, squaring the ends and spine changes.
October 25, 2026 · 8 min read