
How to Fletch Arrows With a Jig, Step by Step
How to fletch arrows with a jig: tools, adhesive clamp and cure times, shaft prep, gluing steps, cock vane, helical vs offset, and fixing vanes that fall off.

By Archery Insider Editorial Team
· 12 min read
In this article
Fletching your own arrows is one of the most useful skills in archery. It saves you a trip to the shop every time a vane tears, lets you try different vanes or feathers, and gives you full control over how your arrows are built. With a jig, the right adhesive and a careful routine, it's easy to get consistent results.
This guide covers what you need, the different jigs and clamps, how to choose an adhesive (with clamp and cure times from the makers), each step from stripping old vanes to curing new ones, cock vane orientation, straight, offset and helical fletching, and how to fix vanes that keep coming off.
The quick answer
To fletch an arrow with a jig: strip and clean the fletching area, dry-fit a vane in the clamp so its base sits flush on the shaft, apply adhesive to the vane base, clamp it to the shaft for the adhesive maker's clamp time, rotate the nock receiver to the next position, and repeat. Add a dot of glue at the tip and tail of each vane, then let the arrows cure fully before shooting.
What you need
- A fletching jig with the right clamp (straight, offset or helical).
- Vanes or feathers. If you use feathers with a helical clamp, they must match the clamp's wing (see below).
- Fletching adhesive suited to your vanes and shafts.
- Solvent recommended by your shaft maker, such as 91% isopropyl alcohol.
- Clean, white paper towels or lint-free cloths.
- Gloves and ventilation. Easton advises gloves and good ventilation when using solvents.
- A blunt knife or vane stripper for removing old fletching.
- Optional: arrow wraps, a fine abrasive pad if your shaft maker recommends one, and a marker for numbering arrows.
Fletching jig types
Single-clamp jigs
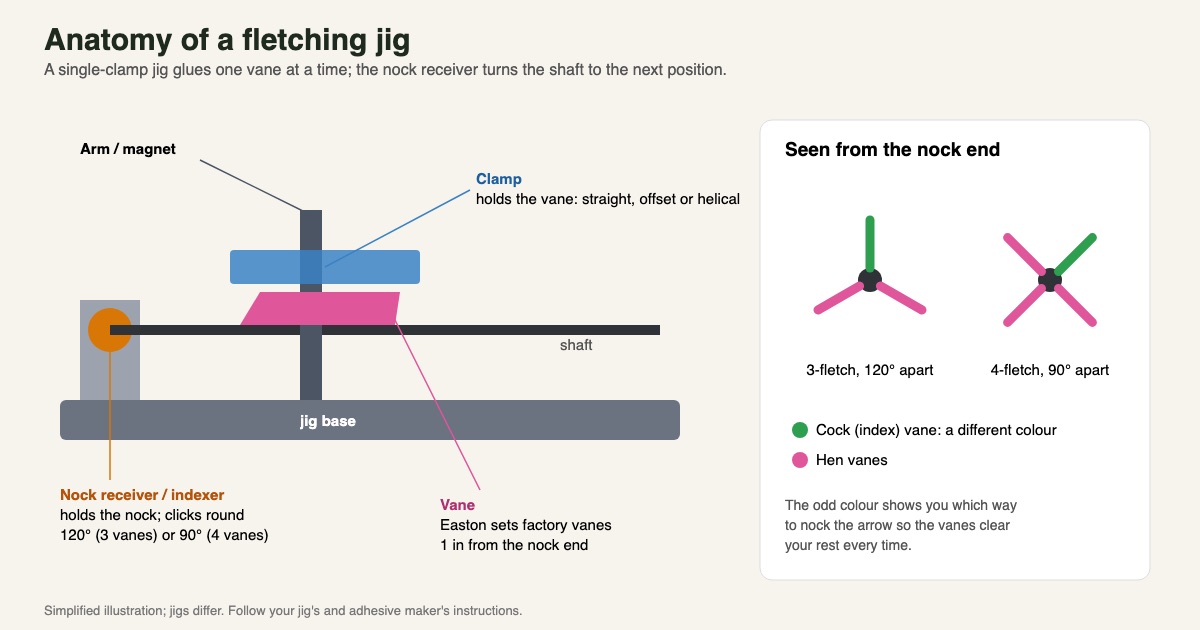
The classic design holds one vane at a time in a clamp, often attached to a magnetic arm. A nock receiver (or indexer) holds the arrow by its nock and rotates it to each position: 120° apart for three vanes, 90° for four. You glue one vane, wait for the clamp time, rotate, and repeat. Single-clamp jigs are inexpensive, adaptable and precise, but slower.
Multi-vane (tower) jigs
Tower or multi-clamp jigs fletch all the vanes at once. Bohning's Cauldron, for example, fletches three vanes at a time, with clamp options from straight to 3° helical. They're much faster for a dozen arrows. Our Bohning Tower Jig review covers one popular design in detail, including re-fletching with it.
Clamps: straight, offset and helical
The clamp sets the angle of the vane on the shaft:
- Straight: the vane runs parallel to the shaft.
- Offset: the vane sits at a slight angle but stays straight along its length.
- Helical: the vane is curved around the shaft, like a gentle spiral.
Bohning defines it simply: "A helical is defined as any vane angle that is not a 0° straight fletch. An offset is, quite simply, a minor helical and usually refers to anything between 0° and 2°." It notes that some jig makers quote angles in degrees per inch, "making the values appear higher", so compare like with like.
Choosing an adhesive
Adhesives fall into two broad groups: standard cements, which are slower but more forgiving, and instant (cyanoacrylate) adhesives, which are quick but can be brittle. Fletching tape is a third option. Bohning publishes these clamp and cure times for its own products:
| Adhesive (Bohning) | Type | Clamp time | Cure before shooting |
|---|---|---|---|
| Fletch-Tite Platinum | Standard cement | 5 minutes | 24 hours; 48 hours is best (48 h if humid) |
| Blazer Bond | Instant | 20 seconds | 2 hours |
| Fletch Fuse | Instant | 30 seconds | 2 hours |
| Fletching tape | Tape | Immediate | Immediate |
Other brands differ, so always follow the label on your adhesive. Advice varies even between respected sources. Olympian Crispin Duenas, writing for Archery 360, says that some glues "bond almost instantly, but they're brittle when they harden", while standard cement takes "about 20 minutes to harden", and he keeps "the fletching in the clamp while the glue hardens." That's longer than Bohning's 5-minute clamp time. A longer clamp does no harm if you have the patience; the maker's label sets the minimum.
Humidity matters. Bohning recommends that you "fletch arrows and allow to cure in a controlled climate with low humidity (30-50% relative humidity). If humidity is too high (especially above 70% relative humidity) we recommend fletching with an instant adhesive."
Step 1: Remove old fletching safely
If you're re-fletching, start by stripping the old vanes and glue without damaging the shaft.
- Don't soak carbon. Easton: "Do not soak any carbon shaft in solvents to remove the fletching or fletching adhesive. This can weaken the resin that bonds the carbon fibers."
- Instant adhesives: Easton suggests you "carefully peel off the vanes with a knife (not razor sharp)", "being careful not to scrape deep enough to damage the carbon fibers."
- Standard cements: pull the vanes off by hand or with pliers, then remove the remaining glue.
- Clean up: Easton says to "wipe fletching area with lacquer thinner" and "do a final wipe with 91% isopropyl alcohol", then "let shafts dry thoroughly before re-fletching." Note Easton's caution about solvents with nocks fitted, below.
- Tools: Bohning recommends a stripper tool for vanes and glue, followed by a wipe with acetone or denatured alcohol, and notes that "soaking is not necessary." Wraps can be removed with a hair dryer or hot water.
Wear gloves, work in a ventilated space, and keep solvents away from flames.
Step 2: Clean and prepare the shaft
Clean preparation is what makes vanes stay on. The details depend on the shaft maker, and makers don't agree, so follow the instructions for your shafts.
- Easton: "Carefully wipe down just the fletching area of the shaft with M.E.K. (Methyl Ethyl Ketone) or 91% Isopropyl Alcohol using a clean, white paper towel. If your nock is already permanently installed, use 91% isopropyl alcohol in place of all other solvents." It warns: "Do not soak carbon or aluminum/carbon shafts in any solvents", and "CAUTION: Do not use lacquer thinner, M.E.K., or acetone with the nock installed."
- Bohning: for carbon and aluminium, "Clean shaft with Bohning SSR and scrub with a Scotch-Brite® pad. Rinse under HOT running water and let air dry."
- Gateway Feathers: "Scuff the fletching area of the arrow with fine grit sandpaper or steel wool. Clean this same area using a solvent recommended by the manufacturer."
Whichever method you use, don't touch the cleaned area with your fingers afterwards.
Do you need to clean the vanes?
That depends on the vane. Easton says that if you're using other brands of adhesive or vanes, "wipe the base of the vanes with MEK or lacquer thinner to remove any mold release chemical." Bohning, by contrast, primes its vanes at the factory and asks you to "NOT CLEAN YOUR BOHNING VANES." Check your vane maker's advice.
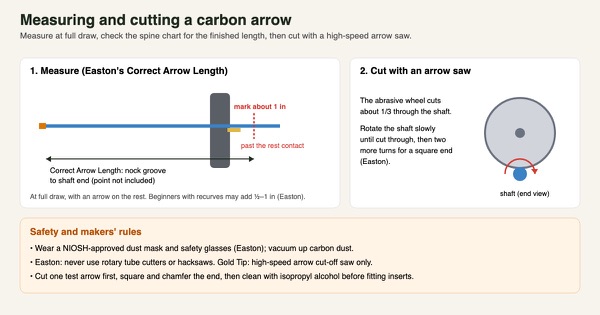
If you're also cutting your shafts, do that first. Our guide to cutting carbon arrows explains how, and how long should arrows be covers choosing the length.
Step 3: Set up the jig
- Fit the right nock receiver for your nock type and set it to the correct index spacing (three or four vanes).
- Dry-fit a vane. Bohning: "Make sure your jig is properly set-up so that the base of the vane is completely flush with the shaft. Test this by putting a vane and shaft in the jig WITHOUT any glue."
- Set the vane position. Easton places factory vanes "1″ from the nock-end of the shaft to the start of the vane." Many jigs have an adjustable stop or marks to repeat that position.
- Index the cock vane. Decide which clamp position gets the odd-coloured vane, and start with it so every arrow matches.
- Check that the vane seats evenly along its full length when the clamp closes, with no gaps at the tip or tail.
Step 4: Glue, clamp, rotate, repeat
- Load the vane into the clamp at your set position.
- Apply adhesive. Bohning's guidance depends on the type: with a standard cement, "fill the entire length of the vane base with a bead of glue"; with instant glues, "dab the base of the entire length of the vane using small dots of glue."
- Clamp it to the shaft. Close the clamp onto the shaft and press it gently into the nock receiver so it seats evenly.
- Wait the full clamp time for your adhesive.
- Remove the clamp carefully, sliding it away without dragging the vane.
- Rotate the nock receiver to the next position and fletch the next vane.
- Repeat until all the vanes are on, then move to the next arrow.
Work steadily. With a single-clamp jig and a slow cement, many archers fletch several arrows in rotation: a vane on arrow one, a vane on arrow two, and so on.
Step 5: Tip-and-tail dots and cure
Once the vanes are on, Bohning recommends that you "dot tip and tail of vane with a small amount of glue for added security." The front edge of a vane takes the most punishment, so this small step helps prevent peeling.
Then let the arrows cure for the full time on the adhesive label, longer in humid conditions, before you shoot them. Store them upright or in a rack so nothing presses on the new vanes.
Cock vane colour and orientation
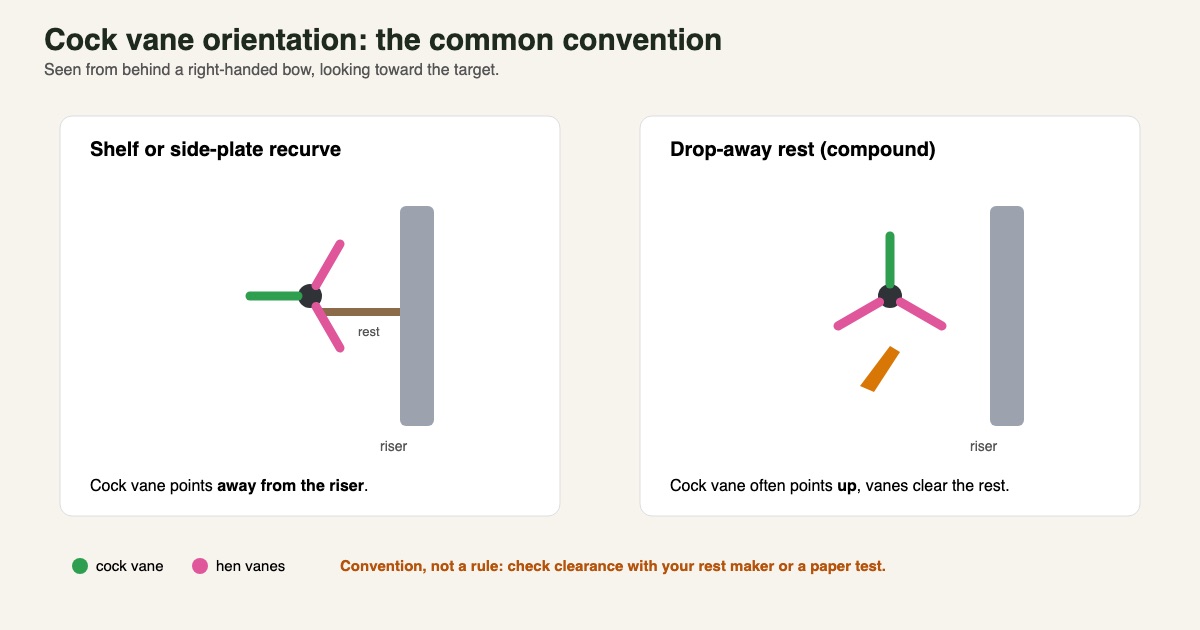
Most fletched arrows have one vane in a different colour: the cock vane (or index vane). Its job is to show which way to nock the arrow, so the same vane faces the same way on every shot and the other two (the hen vanes) clear the rest.
There's a common convention for orientation, though no universal rule:
- Shelf or side-plate recurve: the cock vane usually points away from the riser, so the two hen vanes pass either side of the rest.
- Compound with a drop-away rest: the cock vane often points up, since the rest falls away.
Rests and setups vary, so check your rest maker's advice and confirm clearance with a paper test. Our guides to arrow rests and paper tuning explain both.
Straight vs offset vs helical, and feather wings
More angle means more spin and faster stabilisation, but also more drag. Many archers use an offset or helical, while straight fletching gives the least drag. The best choice depends on your bow, rest clearance and vanes, so test with your own setup.
Feathers have a wing. Feathers come from either the left or right wing of a bird, and they curve naturally. Gateway Feathers explains: "Clamps marked with a RH indicates right wing helical, while LH indicates left wing helical." Match the feathers to the clamp, and "do not mix left and right feathers on a single arrow." Handedness doesn't decide it: "A right handed person may use left wing feathers or right wing feathers."
Our feathers vs vanes comparison explains when each makes sense.
Three vs four fletch
Three vanes at 120° is the most common configuration. Four-fletch arrows, with vanes at 90° (or other spacings some archers prefer), are also used, and many jigs can be set up for either. Your jig's nock receiver needs to index to the right spacing. Test any change on paper or at distance.
Arrow wraps
Arrow wraps are thin printed sleeves applied to the fletching area before the vanes. They make arrows easier to see, can make re-fletching easier, and give vanes a consistent surface to bond to. Bohning even suggests a wrap as one fix for shafts that won't hold glue well. Indoor archers often use them with larger vanes. For indoor fletching ideas, see our indoor archery guide.
Troubleshooting: vanes coming off
Bohning's three-scenario check is the quickest way to find the cause. Look at where the adhesive stayed when the vane came off:
| What you see | Likely cause | What to do |
|---|---|---|
| Glue on the shaft, not on the vane | The vane: release agent or no primer | Clean or prime the vane as its maker advises; try a compatible adhesive |
| Glue on the vane, not on the shaft | Shaft preparation | Clean the shaft again; Bohning says "some shafts need additional abrasion" or a wrap |
| Glue on both | Jig set-up, clamp time, a damaged clamp or not enough cure time | Re-check the dry fit, follow the clamp and cure times, inspect the clamp |
Other common mistakes:
- Touching the cleaned shaft with bare fingers.
- Shooting before the adhesive has cured, especially in humid weather.
- Mismatched feathers and clamp (left wing in a right helical clamp).
- Inconsistent vane position, so arrows fly differently. Bare-shaft or walk-back tests reveal problems; see bare-shaft and walk-back tuning.
Crossbow bolts
Crossbow bolts are fletched the same way, but check your crossbow maker's requirements for vane height and configuration, because vanes must clear the flight groove and rail. Our guide to crossbow bolts explains more.
When you're ready to set up, you can browse fletching jigs or fletching glue on Amazon.
Frequently asked questions
How do you fletch an arrow with a jig?
Clean the fletching area, dry-fit a vane in the clamp, apply adhesive to the vane base, clamp it to the shaft for the adhesive's clamp time, rotate the nock receiver, and repeat. Dot the tip and tail with glue and cure fully before shooting.
Why is one fletching a different colour?
It's the cock (index) vane. It shows you how to nock the arrow so that it faces the same way every shot and the other vanes clear your rest.
Which way does the cock vane go?
By common convention, away from the riser on a shelf or side-plate recurve, and often up on a compound with a drop-away rest. Check your rest maker's advice and confirm clearance with a paper test.
How long should fletching glue dry before shooting?
It depends on the adhesive. Bohning's figures range from 2 hours for its instant adhesives to 24 to 48 hours for its standard cement. Follow your adhesive's label and allow longer in humid conditions.
Do I need to clean new vanes?
It depends on the brand. Easton recommends wiping vane bases with MEK or lacquer thinner to remove mould release when using other brands; Bohning asks you not to clean its pre-primed vanes.
Can you fletch arrows without a jig?
It's possible with tape or by hand, but a jig makes vane position, angle and spacing consistent from arrow to arrow, which is why most archers use one.
Left or right wing feathers?
Either works, but match the feathers to the clamp (LH or RH helical) and never mix wings on one arrow. Gateway notes that a right-handed archer can use either wing.
How far from the nock should vanes be?
Easton places its factory vanes 1 inch from the nock end of the shaft. Use your jig's stop to repeat the same position on every arrow.
Related articles
 Reviews
Bohning Tower Jig Review: Fletch Three Vanes at Once
Bohning Tower Jig review: fletching three vanes at 120 degrees, straight, offset and helical arms, clamps and centring pins, shaft sizes, and how to use it.
June 4, 2025 · 6 min read
 Comparisons
Feathers vs Vanes: Which Arrow Fletching Should You Use?
Feathers vs vanes compared: weight, forgiveness off the shelf, speed, drag, weather, durability, noise, rests, broadheads and which fletching suits your bow.
Updated September 30, 2026 · 5 min read
 Training
How to Cut Carbon Arrows Safely at Home
How to cut carbon arrows safely: measuring the right length, what Easton and Gold Tip say about tools, carbon dust safety, squaring the ends and spine changes.
October 25, 2026 · 8 min read