
Paper Tuning a Bow: How to Read Tears and Fix Them
How to paper tune a bow: what it shows, frame setup, reading nock-high, low, left and right tears, the order of fixes, and when to see a pro shop.
By Archery Insider Editorial Team
· 10 min read

In this article
Paper tuning is the simplest way to see how an arrow leaves your bow. You shoot through a sheet of paper held in a frame a few feet away and read the hole it tears. A clean "bullet hole" means the arrow is flying point-first. A tear shows the arrow is leaving at an angle, nose one way and tail the other, which costs accuracy and, with broadheads, can make arrows veer.
This guide explains when to paper tune, how to set it up, how to read the tears, the order to fix them in, and what to do when paper tuning alone is not enough.
When to paper tune
- After setting up a new bow or new arrows.
- After changing the arrow rest, nocking point, string or cables.
- When arrows fishtail or porpoise in flight, or broadheads hit away from field points.
- Before hunting season, as a quick check.
Before you start
Paper tuning reveals problems in the bow and arrow, but only if the shooter is consistent. Lancaster Archery lists three prerequisites:
- A correct grip. A twisted or tense grip causes "erratic arrow flight" that looks like a tuning problem.
- A clean release, without punching the trigger or moving your hand sideways.
- Timed cams on dual-cam bows. If the cams roll over at different times, no rest adjustment will fix the tear.
It also helps to start from a sound basic setup: the arrow centred on the rest, the nocking point set so the arrow sits level or slightly nock-high, and arrows of the right spine. Our arrow guide explains spine.
What you need
- A paper tuning frame (bought or home-made) and plain paper.
- A backstop target that stops your arrows safely.
- Allen keys for the rest, sight and limb bolts.
- A bow square to check nocking point height.
- A marker pen to record rest and nocking point positions before you change them.
- A notebook or phone to log each change and the tear it produced.
- Access to a bow press, or an archery shop, if cam or cable adjustments are needed.
Building a simple frame
A frame does not need to be fancy. Many archers use a square of wood or plastic pipe with a large opening, roughly 18 to 24 inches across, and tape or clip a sheet of paper tightly across it. Some cut the middle out of a large cardboard box and tape paper over the hole. What matters is that the paper is stretched flat and does not flex when the arrow passes through, that the frame is stable at chest height, and that a safe backstop sits a few feet behind it. Replace the paper often; tears that overlap are hard to read.
Setting up
| Item | Guidance |
|---|---|
| Frame | Holds the paper "by all four corners, so it is rigid" (Lancaster) |
| Paper | Plain paper stretched tight; wrinkled or loose paper tears unclearly |
| Height | Roughly chest height, so you shoot level |
| Your distance from the paper | About 6 feet (Lancaster); 5 to 10 feet (Bowhunter) |
| Backstop | A target block 4 to 6 feet beyond the paper |
| Arrows | Fletched arrows with field points, the same as you shoot normally |
Feathers can make tears harder to read: Bowhunter notes there "will be little or no cuts when shooting feather fletching." Vanes leave clearer marks.
How to read the tears
Look at the paper from the shooter's side. The round hole is where the point went through; the cuts are from the fletching. The direction the fletching cuts sit from the point shows where the tail of the arrow was.
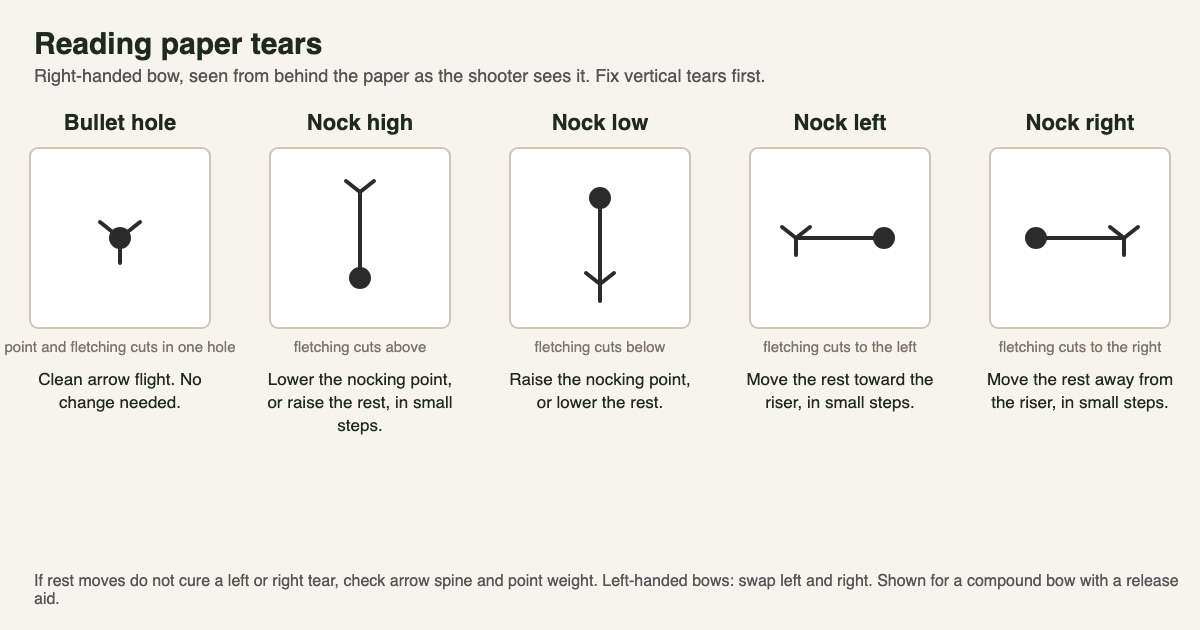
| Tear | What the arrow is doing | First fix (right-handed bow) |
|---|---|---|
| Bullet hole | Leaving point-first | None |
| Nock high | Tail above the point | Lower the nocking point, or raise the rest |
| Nock low | Tail below the point | Raise the nocking point, or lower the rest |
| Nock left | Tail left of the point | Move the rest toward the riser |
| Nock right | Tail right of the point | Move the rest away from the riser |
For a left-handed bow, swap left and right.
Checking fletching clearance
Erratic tears that change from shot to shot can come from the fletching brushing the rest, cables or riser. A simple check is to dust the fletching and rest area with a dry powder, such as an unscented foot or deodorant spray, and shoot an arrow into the target. Marks rubbed off the powder show where contact happens. Rotating the nock slightly, adjusting the rest or changing to a rest with more clearance usually solves it. Fix clearance problems before trusting your paper tears.
The order of fixes
Both Lancaster and Bowhunter agree on the order: correct the vertical tear first. Bowhunter explains that elevation is "easier to accomplish than" windage. Then:
- Shoot two or three arrows through fresh paper to confirm the pattern is consistent, not a one-off bad shot.
- Adjust the rest or nocking point for the vertical tear in small steps, re-shooting after each change.
- Adjust the rest left or right for the horizontal tear. Bowhunter recommends "careful windage adjustments in 1/16-inch increments."
- Check at a second distance, a few feet farther back, to confirm the arrow is flying straight rather than recovering.
- Mark your settings once you have a bullet hole, so you can return to them.
Common paper tuning mistakes
- Adjusting after one arrow. Shoot at least two or three to confirm a pattern before changing anything.
- Changing two things at once. Move the rest or the nocking point, not both, so you know what made the difference.
- Big adjustments. Small steps, around 1/16 inch, are enough; large moves overshoot.
- Standing too close. Arrows need a few feet to stabilise; tears right at the riser can mislead.
- Shooting tired. Form breaks down as you fatigue, and the tears start to reflect you rather than the bow.
- Forgetting the sight. After moving the rest, re-sight the bow before judging accuracy.
Setting up a new bow: a sensible order
- Set draw length and draw weight to suit you.
- Install the rest, roughly centred, and set the nocking point so the arrow sits level or slightly nock-high.
- Fit the peep and sight, and check the sight is level.
- Paper tune for a bullet hole, vertical tears first.
- Walk-back tune to confirm centre shot.
- Sight in at your distances.
- Broadhead tune if you hunt.
If the rest does not fix it
Lancaster suggests an escalating sequence once the rest and nocking point have been tried: cam timing and cam lean (shimming or twisting cables to move the cams), and, for vertical fine-tuning, the limb bolts. Bowhunter adds point weight and arrow spine to the list for persistent left or right tears.
| Persistent problem | Possible causes |
|---|---|
| Left or right tear that moves with the rest but never closes | Arrow spine too stiff or too weak for the setup; point weight |
| Tear changes from shot to shot | Grip, release or form; fletching contact with the rest |
| Vertical tear on a dual-cam bow that the nocking point cannot fix | Cam timing |
| You need extreme rest positions to get a bullet hole | Underlying setup problem; get a pro shop to check |
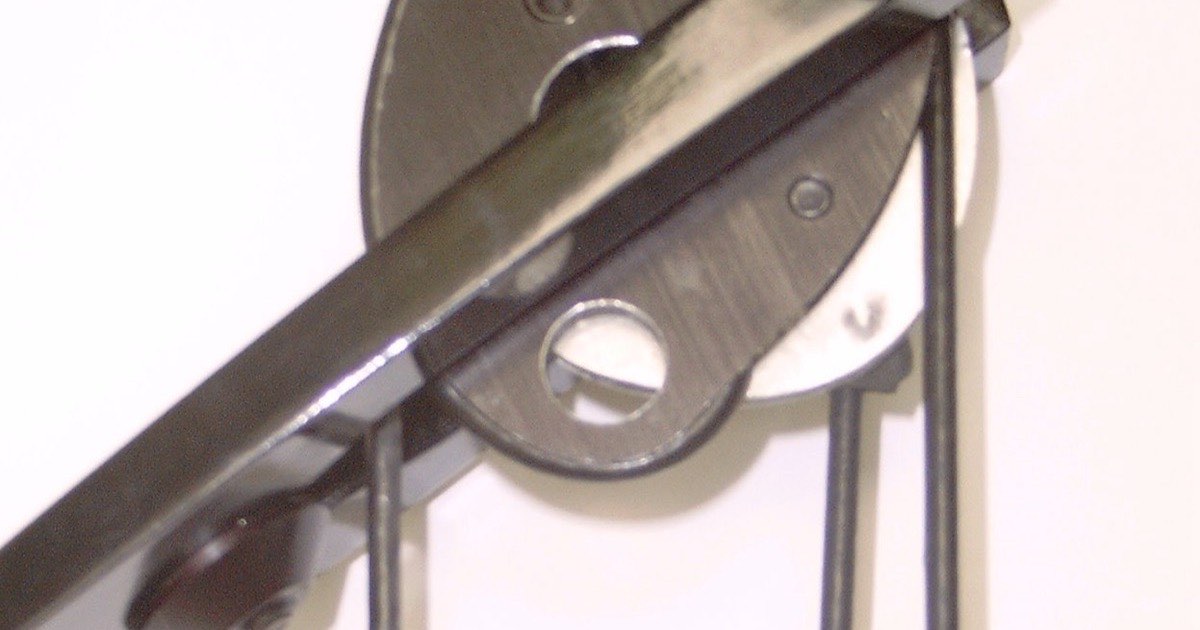
Lancaster's advice is to seek help when you find yourself at extreme rest positions or keep failing to cure a tear. Cam and cable work usually needs a bow press, and a mistake can damage the bow.
Paper tuning and finger shooters
Paper tuning is most used with compound bows and release aids. Recurve archers shooting with fingers can paper tune too, but a finger release makes the arrow flex sideways as it leaves the string (the "archer's paradox"), so tears are harder to read. Many recurve archers rely more on bare-shaft and group tuning. Our aiming guide covers the finger-shooting basics.
Walk-back tuning
Walk-back tuning checks whether your rest is centred, so arrows fly straight at every distance rather than drifting left or right.
- Put a vertical line on a target with tape or a marker, and a small aiming dot at the top.
- Shoot one arrow at the dot from 10 yards using your 20-yard pin.
- Step back to 20, 30 and 40 yards, aiming at the same dot with the same pin each time. The arrows will hit lower as you go back.
- Look at the line of arrows. If they follow the vertical line, your centre shot is good. If they drift left or right as distance increases, make a very small rest adjustment and repeat.
- Then adjust the sight, not the rest, to bring the group back to centre.
Bare-shaft tuning for recurve archers
Recurve archers often use bare-shaft tuning instead of, or as well as, paper. You shoot a few fletched arrows and one or two identical arrows without fletching at the same aim point from a short distance, often around 15 to 20 yards. Fletching hides small tuning problems; a bare shaft shows them clearly. Where the bare shafts land relative to the fletched group indicates whether the arrow is reacting as if too stiff or too weak, or whether the nocking point is too high or low. Arrow makers' tuning guides explain how to read the result for your bow and release, and adjustments typically involve the pressure button, point weight, brace height or arrow spine.
Broadhead tuning
Hunters should finish by checking that broadheads fly with field points:
- Shoot a group of field points at 20 to 30 yards.
- Shoot one or two broadheads at the same aim point, on a broadhead-rated target.
- Compare. If the broadheads group with the field points, you are ready. If they hit noticeably away from them, check that each broadhead is straight and the arrow spins true, then make small rest or nocking point adjustments and re-test.
- Confirm with the actual heads you will hunt with, then replace or sharpen the blades before hunting.
Good paper tuning usually makes broadhead tuning quick, because a straight-flying arrow steers the broadhead true.
After paper tuning
A bullet hole is a good start, not the finish. Many archers follow it with:
- Walk-back tuning, shooting at the same aim point from increasing distances to check left-right drift.
- Broadhead tuning, comparing broadhead and field-point groups at hunting distances.
- Re-checking after any change to arrows, rest or string.
Clean arrow flight also helps your broadheads hit where you aim, which matters for shot placement when hunting.
Paper tuning
Advantages
- Quick, cheap and easy to set up at home
- Shows arrow flight directly
- Great for initial setup after equipment changes
Trade-offs
- Form problems can look like tuning problems
- Feathers leave unclear cuts
- A bullet hole up close does not guarantee perfect flight at distance
You can browse paper tuning frames or archery tool kits on Amazon. Many archers simply build a frame from wood and tape.
Frequently asked questions
What does a nock-high tear mean?
The tail of the arrow is passing above the point. Lower the nocking point or raise the rest in small steps.
How far should I stand from the paper when paper tuning?
About 5 to 10 feet. Lancaster suggests about 6 feet, with a backstop 4 to 6 feet beyond the paper.
Should I fix vertical or horizontal tears first?
Vertical first. Both Lancaster Archery and Bowhunter recommend correcting elevation before windage.
What kind of paper should I use?
Plain paper held tight in a rigid frame. Loose or wrinkled paper tears unclearly.
Can I paper tune with feathers?
You can, but feathers leave little or no cuts, so tears are harder to read than with vanes.
How often should I paper tune my bow?
After any equipment change, such as new arrows, a new rest or a new string, and as a quick check before hunting season. Between changes, a well-tuned bow usually stays tuned.
Can paper tuning fix bad groups?
It fixes arrow flight problems caused by the bow and arrow. If your groups are still poor after a bullet hole, look at form, arrow consistency and sight setup.
Should I paper tune before or after sighting in?
Before. Paper tuning changes the rest and nocking point, which moves where arrows hit. Get clean arrow flight first, then sight in.
Can I paper tune a bow by myself?
Yes. You only need a frame, paper, a backstop and basic tools for the rest and nocking point. Cam timing, cable work and string twisting need a bow press, so leave those to an archery shop if you do not have one.
Related articles
 Guides
How to Choose Arrows: Spine, Length, Weight and Spine Charts
How to choose arrows: what spine means, reading a spine chart, measuring arrow length, arrow weight and FOC, fletching, and bare-shaft tuning to confirm it.
Updated June 26, 2026 · 9 min read
 Reviews
Trophy Ridge Whisker Biscuit Review: The Full-Containment Rest
Trophy Ridge Whisker Biscuit review: how a full-containment bristle rest works, sizes and versions, set-up, vane wear trade-offs, and who it suits.
Updated September 3, 2025 · 6 min read
 Training
How to Aim a Bow: Sights, Gap and Instinctive
How to aim a bow: eye dominance, anchor points, sights, gap shooting, string walking, face walking and instinctive aiming, with practice drills for each.
October 7, 2026 · 11 min read