
Bare Shaft and Walk-Back Tuning Explained
How bare shaft and walk-back tuning work, how to read results for finger and release shooters, what distances to use, and how they fit with paper tuning.

By Archery Insider Editorial Team
· 11 min read
In this article
Paper tuning shows how an arrow leaves the bow over the first few feet. Two other tests show what happens further downrange: bare shaft tuning, which compares unfletched arrows with fletched ones, and walk-back tuning, which checks whether your arrows stay on a straight line as you step back. Together they help you confirm that your arrows are spined correctly and your rest and nocking point are set right.
This guide explains how each test works, how to read the results for finger shooters and release shooters, what distances to use, and how they fit with paper tuning.
Where these tests fit with paper tuning
A sensible order of work for most bows is:
- Set up the bow to the manufacturer's specifications: brace height, draw weight, draw length, nocking point and rest position.
- Paper tune at short range to fix the worst tears; our paper tuning guide explains how.
- Bare shaft tune to refine nocking point and spine, especially for finger shooters.
- Walk-back tune to fine-tune the rest's left-right position, especially on compounds.
- Check broadheads against field points if you hunt; see field points vs broadheads.
Before any tuning, your form needs to be consistent. Inconsistent form will move arrows more than any tuning change. Our archery form guide covers the basics.
What is bare shaft tuning?
Fletching steers an arrow. That is useful when you are shooting for score, but it hides problems with how the arrow leaves the bow. An arrow that leaves the bow badly will still straighten out if it has fletching, but an unfletched arrow (a bare shaft) cannot correct itself. By comparing where bare shafts land with where fletched arrows land, you can see what the arrow is really doing.
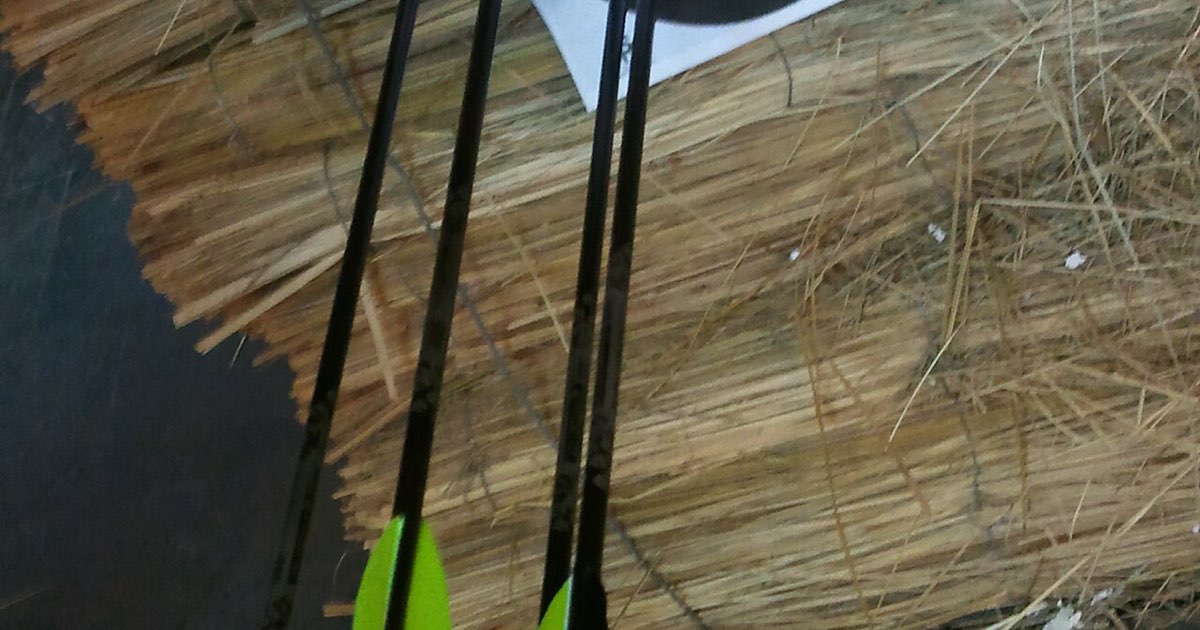
Easton also notes that the test is "useful for determining if the correct shaft has been selected." In other words, if the bare shafts land well away from the fletched group however you adjust the bow, the arrow's spine may be wrong.
What you need
- At least three fletched arrows and two or more identical unfletched shafts: the same model, length, point weight and nock as your fletched arrows.
- A large, safe target or bale with plenty of space around it. Bare shafts can fly unpredictably at first.
- A bow square to measure and move your nocking point.
- The tools to adjust your plunger or rest.
How to bare shaft tune: finger shooters
This section applies to recurves, barebows and longbows shot with fingers.
Distances
Sources differ slightly, but all start close and move back:
- Archery 360 suggests starting at about 10 yards with three fletched arrows and moving to 15 yards once grouped.
- Easton: "Shoot at least three fletched shafts at a distance of 15 to 20 yards (or meters)," then two bare shafts aimed the same way, and "you may want to try shooting 25-30 yards (or meters) for a finer tuning indication."
- Bow International advises: "Only bareshaft tune to a maximum distance of 30m," and suggests checking at "more than one distance. Good choices are 18m and 30m." It also recommends shooting "a minimum of 3 bare and 3 fletched arrows."
Step by step
- Warm up with fletched arrows until you are grouping consistently.
- Shoot three fletched arrows at your starting distance, aiming at a clear spot.
- Shoot two or three bare shafts, aimed at exactly the same spot with the same form.
- Compare where the bare shafts land with the centre of the fletched group.
- Make one adjustment, starting with the nocking point if the bare shafts are high or low.
- Repeat until the height is close, then work on left and right.
- Move back and confirm at a longer distance.
Mark your bare shafts clearly and keep them with your fletched arrows so they stay identical in nock, point and length.
Reading the result
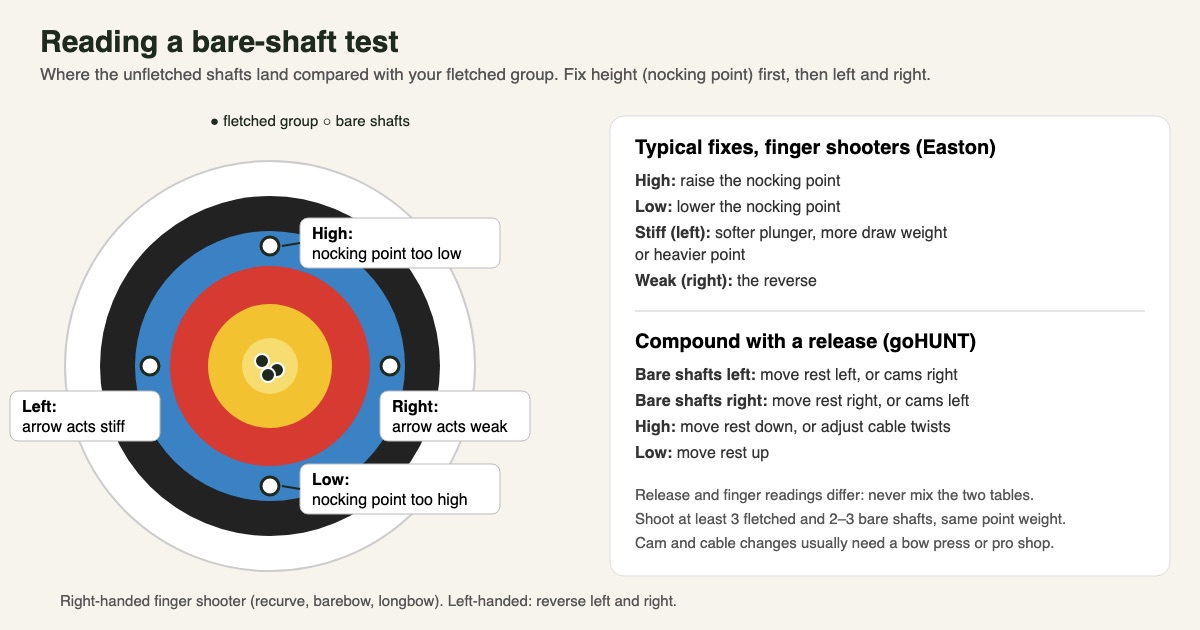
Fix the height first, then left and right. For a right-handed archer shooting with fingers (reverse left and right if you shoot left-handed):
| Bare shafts land… | What it means | Typical fixes (Easton) |
|---|---|---|
| Above the fletched group | Nocking point too low | Raise the nocking point |
| Below the fletched group | Nocking point too high | Lower the nocking point |
| Left of the fletched group | Arrow acting stiff | Decrease plunger tension, increase draw weight, or increase point weight |
| Right of the fletched group | Arrow acting weak | Increase plunger tension, decrease draw weight, or decrease point weight |
Easton puts the height reading simply: "Bare shafts that impact above identically-aimed fletched shafts indicate a low nocking point." Bow International gives the same direction: "If the bareshaft is below the fletched, the nocking point is too high."
Other fixes
If plunger and point weight aren't enough, other changes affect how stiff an arrow acts:
- Arrow length. Archery 360 notes that shortening an arrow by a quarter of an inch stiffens its spine. Cutting is permanent, so make small changes.
- Draw weight. Turning limb bolts up makes the arrow act weaker, down makes it act stiffer.
- Spine. If nothing brings the bare shafts close, you may need a different shaft. Easton says if, after tuning, "the bare shaft impact is more than 6 inches (15 cm) to the right (weak) or left (stiff) of the fletched shafts at 20 yards (18 m)," you should change equipment or spine. Our arrow guide explains how to choose spine.
What "good enough" looks like
You don't need the bare shafts in the middle of the fletched group. Easton says: "It is common on a well-tuned bow to have the bare shaft impact a little low and slightly stiff." Aim for bare shafts landing close to the fletched group, consistently, at the distances you shoot.
An alternative: short-distance tuning
Easton's guide also describes a short-distance method for all bow styles. From 12 to 15 yards, shoot six to eight fletched arrows along the top edge of a target face, then the left edge of a reversed face, and adjust in small steps (Easton suggests 1/32 inch for nocking points and rests, and an eighth of a turn for a recurve plunger) until the arrows line up along each edge. It is a useful option if you don't have the space for longer distances.
Bare shaft safety
Bare shafts fly less predictably than fletched arrows, especially before the bow is tuned. Use a large target with a generous backstop, start close, and check behind the target for clear ground.
Bare shafting a compound with a release
Bare shaft tuning works on compounds too, but the reading is different, because a release aid launches the arrow differently from fingers. Easton notes that for release shooters "it may, in some cases, be necessary to apply adjustments opposite from those described." Don't use the finger table for a compound shot with a release.
goHUNT gives a compound and release reading, starting at 20 yards after paper tuning:
| Bare shafts land… | Typical fix (goHUNT) |
|---|---|
| Left of fletched | Move the rest left, or move the cams right |
| Right of fletched | Move the rest right, or move the cams left |
| High | Move the rest down, or adjust cable twists |
| Low | Move the rest up |
Cam and cable changes usually need a bow press; see how a bow press works. Many archers have a pro shop make these changes.
What is walk-back tuning?
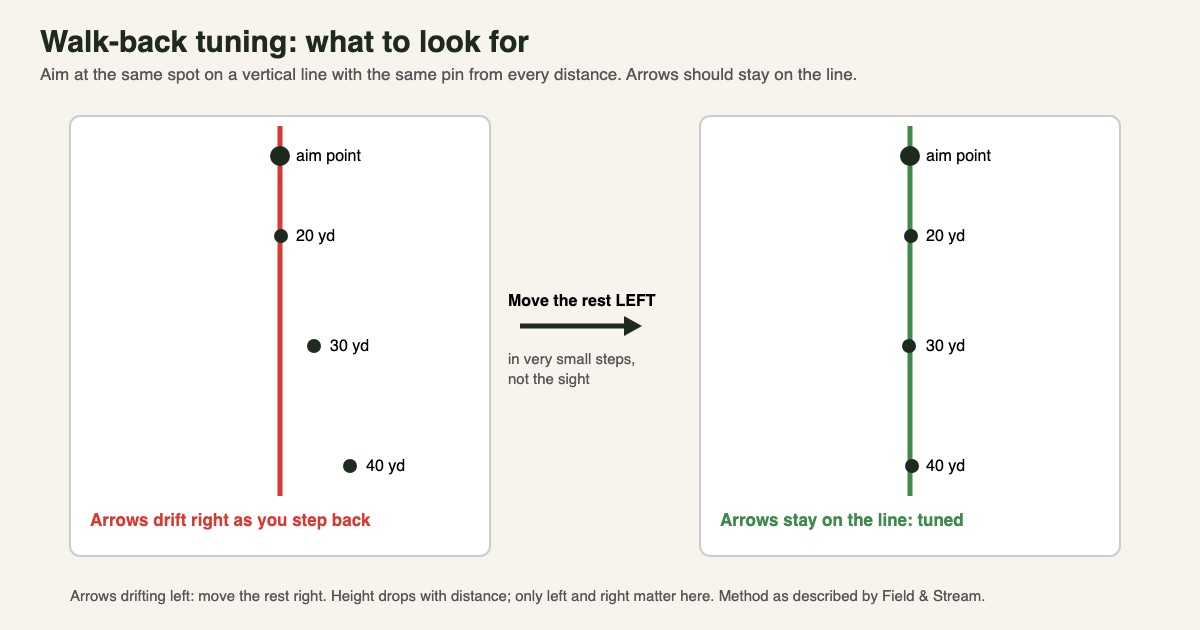
Walk-back tuning is mostly used on compound bows to fine-tune the left-right position of the arrow rest. The idea is simple: if the rest is centred correctly, arrows aimed at the same spot with the same pin will land on a straight vertical line as you step back. If they drift left or right as distance increases, the rest needs to move.
How to walk-back tune
Field & Stream describes the method:
- Set up a vertical line on a target, using "a level or a plum bob" so it is truly vertical. Put an aiming dot near the top.
- Shoot at 20 yards with your 20-yard pin, aiming at the dot.
- Step back to 30 yards and 40 yards or more, still aiming at the same dot with the same 20-yard pin. The arrows will hit lower each time; that is expected.
- Look at the left-right pattern. If the arrows stay on the line, the rest is centred. If they drift, adjust.
- "Move your rest, not your sight." Field & Stream: "if your arrow is consistently right, move the rest to the left and vice versa."
- Make small changes. "A little movement goes a long way." Re-shoot and repeat until the arrows stay on the line.
Shoot several arrows at each distance, or repeat the test, so you are reacting to a pattern rather than one bad shot.
Reading a walk-back test
| What you see | What it usually points to |
|---|---|
| Arrows on the line at every distance | Rest is centred; no change needed |
| Arrows drift further right the further back you go | Move the rest left in small steps |
| Arrows drift further left the further back you go | Move the rest right in small steps |
| Arrows the same distance off the line at every distance | A sight windage issue rather than the rest; adjust the sight |
| Arrows scattered on both sides | Form, a damaged arrow or a loose accessory; fix that before tuning |
Check that your bow is level (bubble centred) on every shot. Tilting the bow, called canting, moves arrows sideways at longer distances and can be mistaken for a tuning problem.
Why walk-back tuning helps after paper tuning
Field & Stream notes that "it's not uncommon for a perfectly paper-tuned bow to hit a tad left or right of center farther out." Paper tuning looks at the first few feet; walk-back tuning shows the result at the distances you hunt or compete.
Walk-back vs paper vs bare shaft
| Test | What it shows | Typical distance | Best for |
|---|---|---|---|
| Paper tuning | How the arrow leaves the bow (tear direction) | A few yards | All bows; first step |
| Bare shaft tuning | Nocking point and spine (how the arrow acts) | About 10–30 yards | Finger shooters especially; also compounds with a separate reading |
| Walk-back tuning | Left-right rest position (centre shot) | 20 yards to 40+ yards | Compounds with sights |
These tests are complementary, not competing. Many archers paper tune first, then use bare shafts or walk-back to fine-tune.
Is bare shaft tuning necessary?
Not for everyone. A beginner shooting a well set-up bow with correctly spined arrows can enjoy archery for years without bare shafting. It becomes useful when you want tighter groups at longer distances, when you are choosing arrows for a new bow, when broadheads won't group with field points, or when you shoot barebow or traditional bows without a sight's help. Easton's point that the test checks "if the correct shaft has been selected" is a good reason to try it whenever you change arrows or bows.
Common mistakes
- Tuning with inconsistent form. Fix form first.
- Shooting too few arrows. One bare shaft can mislead you; use at least two or three.
- Shooting bare shafts too far. Bow International advises a maximum of 30 m, because the aim is to see the bare shaft's primary reaction as it leaves the bow.
- Mixing finger and release readings. Use the right table.
- Changing several things at once. Make one change, then re-test.
- Moving the sight during walk-back. Move the rest instead.
- Making big adjustments. Move rests and nocking points in small steps.
Bare shaft and walk-back tuning
Advantages
- Shows problems that fletching hides
- Confirms arrow spine and nocking point
- Improves accuracy at longer distances
Trade-offs
- Needs consistent form to give useful results
- Bare shafts can damage targets and fly unpredictably
- Some fixes need a bow press or pro shop
You can browse bow squares or archery target faces on Amazon.
Frequently asked questions
Is bare shaft tuning necessary?
Not for every archer, but it is a valuable check on arrow spine and nocking point, especially for finger shooters and when choosing new arrows.
How far should I bare shaft tune?
Start close (about 10–15 yards), then 18–20 yards. Bow International advises no further than 30 m.
Walk-back tuning vs paper tuning: which is better?
Neither. Paper tuning checks how the arrow leaves the bow; walk-back checks left-right accuracy downrange. Use both.
Can you bare shaft tune a compound bow?
Yes, but the reading differs from finger shooting. Use a compound and release table, and expect some fixes to need a press.
What does it mean if my bare shaft hits low?
For a finger shooter, it usually means the nocking point is too high (Bow International and Easton). Lower it slightly and re-test.
How many bare shafts should I shoot?
At least two or three, alongside at least three fletched arrows, so you see a pattern.
Do I need to walk-back tune if I paper tuned?
It helps. A paper-tuned bow can still hit slightly left or right at longer distances.
Related articles
 Training
Paper Tuning a Bow: How to Read Tears and Fix Them
How to paper tune a bow: what it shows, frame setup, reading nock-high, low, left and right tears, the order of fixes, and when to see a pro shop.
October 8, 2026 · 10 min read
 Guides
How to Choose Arrows: Spine, Length, Weight and Spine Charts
How to choose arrows: what spine means, reading a spine chart, measuring arrow length, arrow weight and FOC, fletching, and bare-shaft tuning to confirm it.
Updated June 26, 2026 · 9 min read
 Training
Field Points vs Broadheads: Why Impact Changes
Why broadheads hit differently from field points, and how to fix it: paper tuning, spin-testing, micro-tuning the rest at 30 yards, FOC and re-sighting.
October 14, 2026 · 9 min read