
How to Tune a Recurve Bow: Nock Point, Tiller, Plunger
How to tune a recurve bow step by step: brace height, tiller, nocking point with a bow square, centre shot, plunger tension, and testing with bare shafts.

By Archery Insider Editorial Team
· 11 min read
In this article
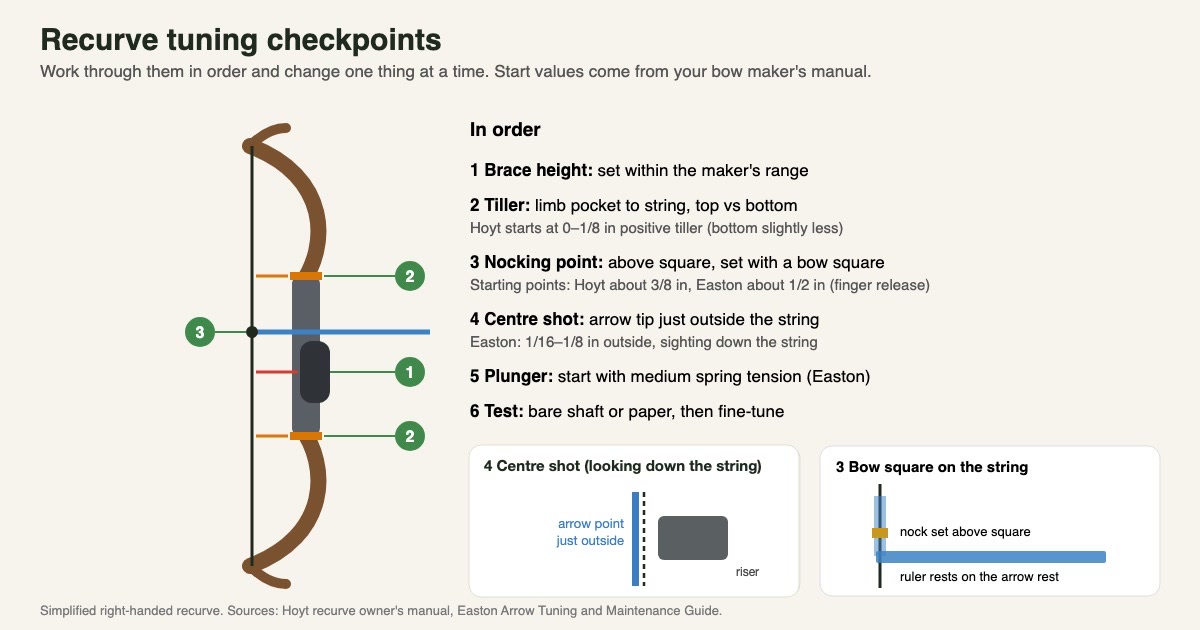
A recurve bow can be tuned just like a compound, and the adjustments are simple enough to make at home with a few basic tools. Tuning means setting up the bow so your arrows leave it cleanly and consistently: the right brace height, balanced limbs, the nocking point in the right place, the arrow lined up with the string, and the plunger set to suit your arrows.
This guide walks through recurve tuning in the order that makes sense, using the published starting values from Easton's tuning guide and Hoyt's recurve manual, and shows how to test the result.
What "tuning" a recurve means
Tuning is not about making a bow more powerful. It is about matching the bow, string and arrows so the arrow leaves the bow straight and flies consistently. A well-tuned recurve groups better, is more forgiving of small form errors, and makes broadheads and field points hit closer together.
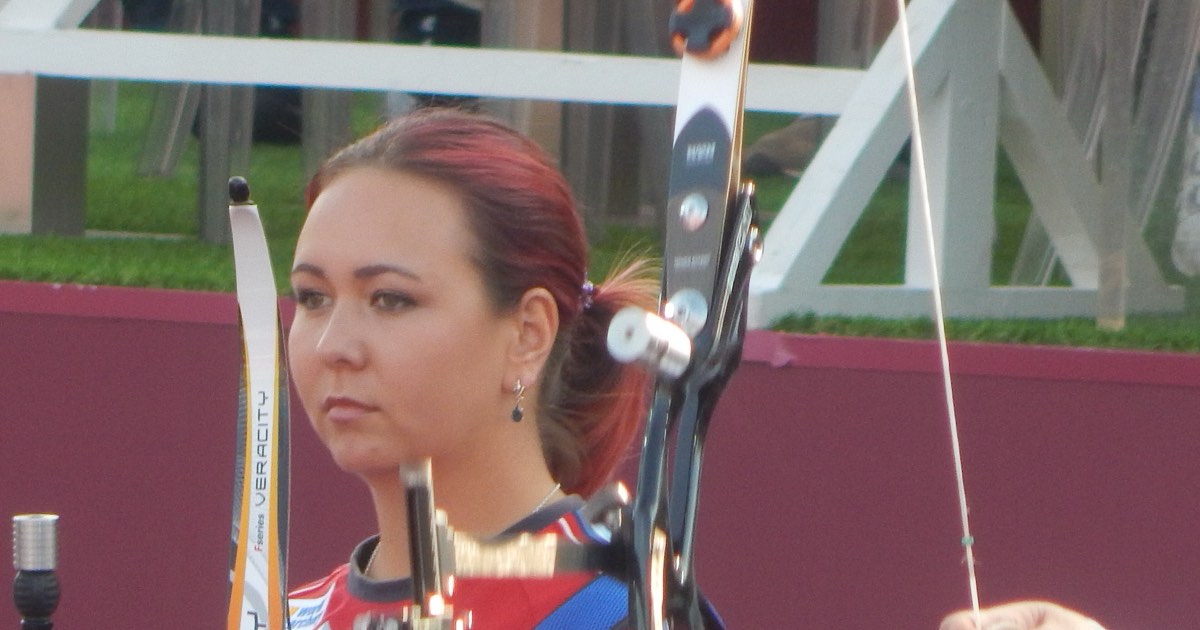
Can you tune any recurve? Most can be tuned to some degree. Takedown and Olympic-style recurves have the most adjustments: limb bolts for tiller and weight, a plunger and an adjustable rest. One-piece traditional recurves usually have fewer adjustments, but brace height, nocking point and arrow choice still make a big difference.
Before you start: tools and a baseline
You will need:
- A bow square to measure brace height and nocking point. Lancaster Archery explains that archers "clamp the square to the string, set the ruler on the bow's arrow rest or shelf and then refer to the vertical ruler that's against the string."
- Allen keys for limb bolts, plunger and rest.
- Nocking pliers and brass nock sets or tied nocking points.
- A bow stringer; our stringing guide explains how to use one safely.
- Matched arrows of the right spine; see our arrow guide.
- A notebook to record every setting before and after you change it.
Your form needs to be consistent before tuning means much. Our archery form guide covers the basics.
Step 1: Assemble the bow and check limb alignment
Assemble a takedown recurve according to the manual, making sure the limbs are seated correctly in the limb pockets. With the bow strung, sight down the string from behind: it should run down the centre of both limbs. Hoyt uses this view to set centre shot later, sighting down the string through the centre of the limbs. If the string sits clearly off-centre on one limb, check the limbs are seated properly, and ask a shop if it persists.
Step 2: Set brace height
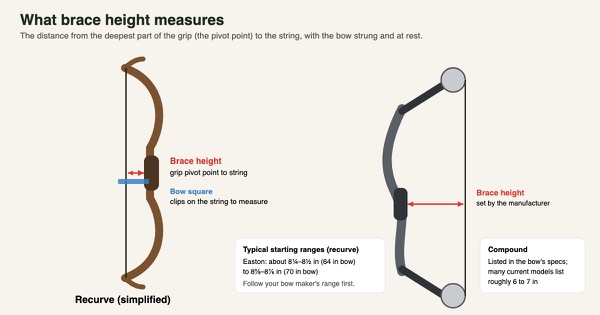
Brace height is the distance from the deepest part of the grip to the string. Easton suggests starting "at the lower end of the manufacturer's recommendation," then adding "3-4 twists to the bowstring and shoot again. Continue this process until the bow feels smoothest and quietest." For a 66-inch bow, Easton's beginning range is 8⅜ to 8⅝ inches.
Brace height also affects tuning: Easton notes that "increasing brace height will make the arrow shoot weaker, and decreasing brace height will make the arrow shoot stiffer." Our full brace height guide covers measurement, ranges and adjustment.
Step 3: Set tiller
What tiller is
Hoyt's manual explains: "Tiller is the difference in draw weight between the upper and lower limbs." You measure it as the distance from the base of each limb pocket to the string, at the top and at the bottom: "measure the distance from the base of the limb pockets to the bow string on both the top and bottom bow limbs."
Starting values
Hoyt suggests you "begin with 0-1/8" positive tiller. (Bottom measurement 0-1/8" less than top measurement.)" Archery 360 describes a tiller of "1/8-inch longer on the top limb than the bottom" for Olympic recurves. In other words, the top measurement is usually slightly larger.
Adjusting tiller
On bows with limb bolts, you adjust tiller by turning the bolts. Hoyt explains how to read it while shooting: "If you find your sight moving up as you are drawing, increase the bottom limb poundage slightly, or decrease the top limb poundage."
To change tiller without changing overall draw weight, Hoyt says to "adjust both the top and the bottom weight/tiller adjustment bolts in equal but opposite directions." It adds an important note: "A tiller adjustment will move the nocking point position," so re-check the nocking point afterwards.
Limb bolt safety
Hoyt warns: "The weight/tiller bolt should never go above flush with the riser. There must be at least six threads of engagement between the riser and weight tiller bolt." Never back limb bolts out beyond your bow's limits.
Step 4: Set the nocking point with a bow square
How a bow square works
Clip the bow square onto the string with its ruler resting on the arrow rest. The scale against the string shows how far above "square" (a right angle from the rest to the string) the nocking point is.
Starting heights
The two main published starting points differ:
| Source | Starting nocking point |
|---|---|
| Hoyt recurve manual | "Approximately 3/8" above the level point of the rest" |
| Easton tuning guide | "About 1/2" (1.3 cm) above square" for finger-release recurves |
| Archery 360 (Olympic recurve setup) | "So the arrow is close to 90 degrees from the string while on the rest" |
Neither is "correct"; they are starting points to refine with testing. Hoyt adds: "Close the nock set with nocking pliers so it is firm, but do not over tighten."
Step 5: Centre shot
Centre shot is the left-right position of the arrow relative to the string. With the bow strung, line the string up with the centre of the limbs (or the centre of the riser) and look at where the arrow point sits.
- Easton, for finger release: align "the 'tip' of the arrow point 1/16" to 1/8" (1.6-3.2 mm) or less outside the bowstring," which compensates for the plunger compressing during the shot.
- Hoyt: "Adjust the plunger or arrow rest until the inside edge of the arrow shaft aligns with this line" (the line of the string sighted down the limbs).
These descriptions are close: the arrow should sit just outside the string for a right-handed finger shooter. Left-handers mirror everything.
Step 6: Set plunger tension
A cushion plunger (pressure button) is a spring-loaded button that the arrow rests against. It absorbs the sideways push of a finger release and helps fine-tune how stiff or weak the arrow acts. Easton says: "If your setup incorporates a cushion plunger, start with the spring tension set at medium."
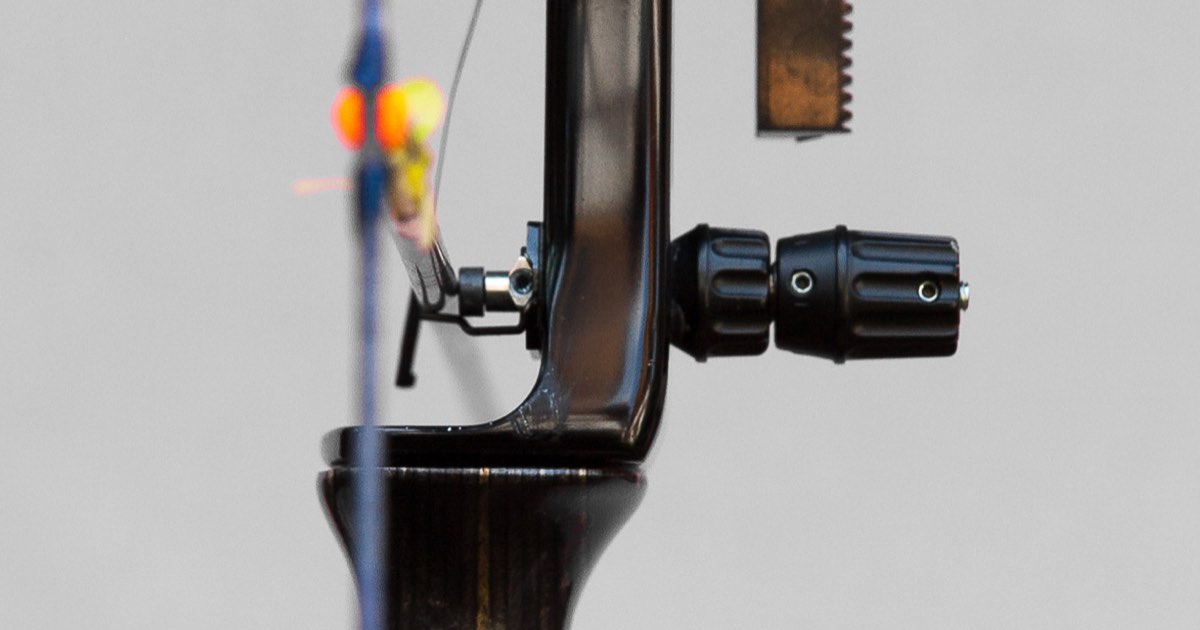
Softer plunger tension makes the arrow act stiffer; firmer tension makes it act weaker. That makes the plunger the main fine-tuning tool for left-right arrow behaviour on Olympic-style recurves.
Step 7: Test arrow flight: bare shaft or paper
With the bow set to its starting values, test how the arrows fly.
Bare shaft testing
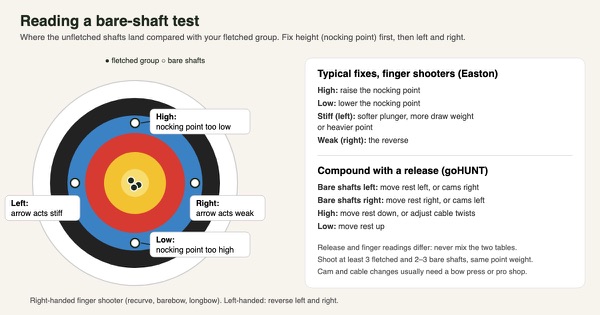
Easton's method: "Shoot at least three fletched shafts at a distance of 15 to 20 yards (or meters). Then shoot two identically-aimed unfletched shafts." For a right-handed finger shooter:
| Bare shafts land… | Fix (Easton) |
|---|---|
| Above the fletched group | Move the nocking point up |
| Below the fletched group | Move the nocking point down |
| Left (arrow acting stiff) | Decrease plunger tension, increase bow weight slightly, or increase point weight |
| Right (arrow acting weak) | Increase plunger tension, decrease bow weight, or decrease point weight |
Easton notes that "it is important to correct for Porpoising first," which means fixing the up-and-down problems (nocking point) before left and right. Our bare shaft and walk-back guide covers distances, reading the results and what "good enough" looks like.
Safety: Easton warns: "Never shoot unfletched shafts with broadheads—flight is extremely erratic and dangerous!"
Paper tuning
Paper tuning also works on recurves; our paper tuning guide explains how to read tears. Many recurve archers use paper for a first check and bare shafts for the detail, because bare shafts show nocking point and spine problems clearly at normal shooting distances.
Fine tuning
Once the basic setup is right, small changes refine it:
- Brace height: a few twists can make arrows act slightly weaker or stiffer.
- Point weight: heavier points make arrows act weaker, lighter points stiffer.
- Draw weight: turning both limb bolts in equal amounts changes overall draw weight, and with it how the arrow acts.
- String strands: Easton notes that "if your arrow reaction is too stiff, decrease the number of strands… too weak, increase the number of strands." This is an advanced adjustment usually made when a new string is built.
- Plunger tension: small turns at a time.
Troubleshooting quick reference
| What you see | Where to look first |
|---|---|
| Sight moves up or down as you draw | Tiller (Hoyt: if the sight moves up, add bottom limb weight or reduce the top) |
| Arrows porpoise (nock moves up and down) | Nocking point height; Easton says fix porpoising first |
| Bare shafts consistently left (right-handed) | Arrow acting stiff: softer plunger, heavier point or more draw weight |
| Bare shafts consistently right (right-handed) | Arrow acting weak: firmer plunger, lighter point or less draw weight |
| Noisy shot or string slap on the arm | Brace height; see our brace height guide |
| Fletching hitting the rest or shelf | Nocking point, rest position and fletching clearance |
| Groups open up after a string change | Brace height, nocking point and string stretch; re-measure everything |
Traditional and barebow recurves
One-piece traditional recurves and many hunting recurves have no limb bolts or plunger, so the tuning tools are fewer: brace height, nocking point, arrow spine, arrow length and point weight. The same bare shaft test applies, and the fixes are the same in principle: move the nocking point for height problems, and change spine, point weight or brace height for left-right problems. Barebow archers using Olympic-style risers can use a plunger and limb bolts in the same way as Olympic archers; our barebow guide explains the style.
A simple tuning session plan
- Session one: set up and measure. Assemble the bow, set brace height and tiller to the maker's starting values, set the nocking point and centre shot, and record everything.
- Session two: nocking point. Shoot fletched and bare shafts at 15 to 20 yards and move the nocking point until bare shafts land level with the fletched group.
- Session three: left and right. Adjust plunger tension (and if needed point weight or brace height) until bare shafts land close to the fletched group horizontally.
- Session four: confirm. Easton suggests that you "may want to try shooting 25-30 yards (or meters) for a finer tuning indication." Confirm, then stop adjusting.
Spreading tuning over several short sessions keeps your form fresh, which makes the results more reliable.
Common recurve tuning mistakes
- Changing several things at once, so you can't tell what helped.
- Forgetting that tiller changes move the nocking point.
- Backing limb bolts out too far. Respect Hoyt's flush and six-thread limits.
- Using mismatched or wrongly spined arrows.
- Tuning with inconsistent form.
- Not recording settings, so you can't return to a good setup.
- Shooting bare shafts with broadheads. Never.
Record your settings
Keep a simple record of:
- Brace height
- Top and bottom tiller measurements
- Nocking point height above square
- Plunger setting (and how many turns from fully in or out)
- Limb bolt positions
- Arrow model, length, point weight and spine
- String (strand count and number of twists)
With this record, you can rebuild your setup after changing strings, limbs or arrows.
Tuning your own recurve
Advantages
- Simple tools and no bow press needed
- Better groups and more consistent arrow flight
- Teaches you how your equipment works
Trade-offs
- Takes patience and consistent form
- Easy to confuse yourself by changing several things
You can browse bow squares or nock sets and pliers on Amazon.
Frequently asked questions
Can you tune a recurve bow at home?
Yes. You need a bow square, Allen keys, nocking pliers and a stringer. No bow press is required.
Where should the nocking point be on a recurve?
Start at the maker's recommendation: Hoyt suggests about 3/8 inch above square, Easton about 1/2 inch for finger shooters. Then refine it with bare shaft or paper testing.
What is a bow square used for?
Measuring brace height and the nocking point's height above square.
What is tiller and should the bottom limb be stiffer?
Tiller is the difference between the top and bottom limbs. Hoyt suggests starting with 0 to 1/8 inch positive tiller, with the bottom measurement slightly smaller than the top.
Can you paper tune a recurve bow?
Yes, although finger releases make paper results less consistent. Many recurve archers prefer bare shaft testing.
How often should you retune a recurve?
Whenever you change strings, limbs, arrows or draw weight, and check your settings regularly against your notes.
Does brace height affect arrow spine?
Yes. Easton says higher brace height makes arrows act weaker and lower makes them act stiffer.
Should I tune with field points or broadheads?
Tune with field points first. If you hunt, then check that your broadheads group with your field points; our guide to field points vs broadheads explains why they can hit differently. Never shoot bare shafts with broadheads.
Related articles
 Gear
Brace Height Explained: What It Does and How to Set It
What brace height is, how to measure it, recommended ranges for recurves and longbows, compound brace height, and how it affects draw weight, speed and spine.
October 22, 2026 · 9 min read
 Training
Bare Shaft and Walk-Back Tuning Explained
How bare shaft and walk-back tuning work, how to read results for finger and release shooters, what distances to use, and how they fit with paper tuning.
October 21, 2026 · 11 min read
 Training
How to String and Unstring a Recurve Bow Safely
How to string and unstring a recurve bow with a stringer, why step-through stringing twists limbs, post-stringing checks, brace height and string care.
Updated February 1, 2025 · 8 min read