
How to Tie a D-Loop on a Bowstring
How to tie a D-loop step by step: the right cord and length, melting ends safely, cinching the knots, whether it changes draw length, and peep alignment.

By Archery Insider Editorial Team
· 9 min read
In this article
A D-loop is the small loop of cord tied onto a compound bow's string that your release aid clips to. It takes a few minutes to tie, costs very little, and makes a real difference to how consistently your bow shoots. It also has to be done properly, because a loop that slips or fails at full draw can damage the bow or hurt you.
This guide explains what a D-loop does, the cord and tools you need, how to tie one step by step, how long it should be, whether it changes your draw length, and how to check it is safe.
What a D-loop does
Without a D-loop, a release aid would clip directly to the string, pressing on the arrow nock and wearing the serving. World Archery explains that the D-loop "prevents wear and tear… and ensures the arrow isn't twisted or pressured by the string at full draw." It also lets the string pull straight back behind the arrow, so the arrow leaves the bow more consistently.
Almost every compound archer who shoots with a release uses one. Our guide to release aids explains the different release types that clip to it.
What you need
- D-loop cord. Use cord sold for D-loops. A common example, BCY #24, is described by Lancaster Archery as "#24 stiff braided polyester," "2.0 mm (.080")," with a "good consistent burn." The burn matters, because the ends are melted to stop the knots slipping.
- A length of cord. Lancaster suggests starting with "about 5"" of cord. World Archery suggests "roughly eight centimetres." Georgia 4-H suggests "4 1/4″" if you use no nock sets, or "4 1/2-4 3/4″" with internal nock sets.
- A lighter for melting the ends.
- A sharp knife, razor or scissors to trim the ends.
- Nock pliers or D-loop pliers to cinch the knots tight and open the loop.
- A bow square to check the nocking point position.
- An arrow nock (Lancaster and World Archery use one to set spacing).
Georgia 4-H also suggests lightly waxing the cord before tying, and securing the bow "with a press, bow vise or set it on a flat surface" so it doesn't move while you work.
Before you start: find the nock position
If you are replacing an old loop, mark where the arrow nock sits before you cut it off. On a new string, set the nocking point first. A bow square clips onto the string and rests on the arrow rest to show where the arrow sits relative to square. Your bow's manual or a pro shop can tell you the recommended starting position; our paper tuning guide explains how the nocking point affects arrow flight.
Some archers use nock sets (small brass or tied stops) inside the D-loop; others let the D-loop knots act as the nocking point. If you use internal nock sets, use the slightly longer cord length above.
How to tie a D-loop, step by step
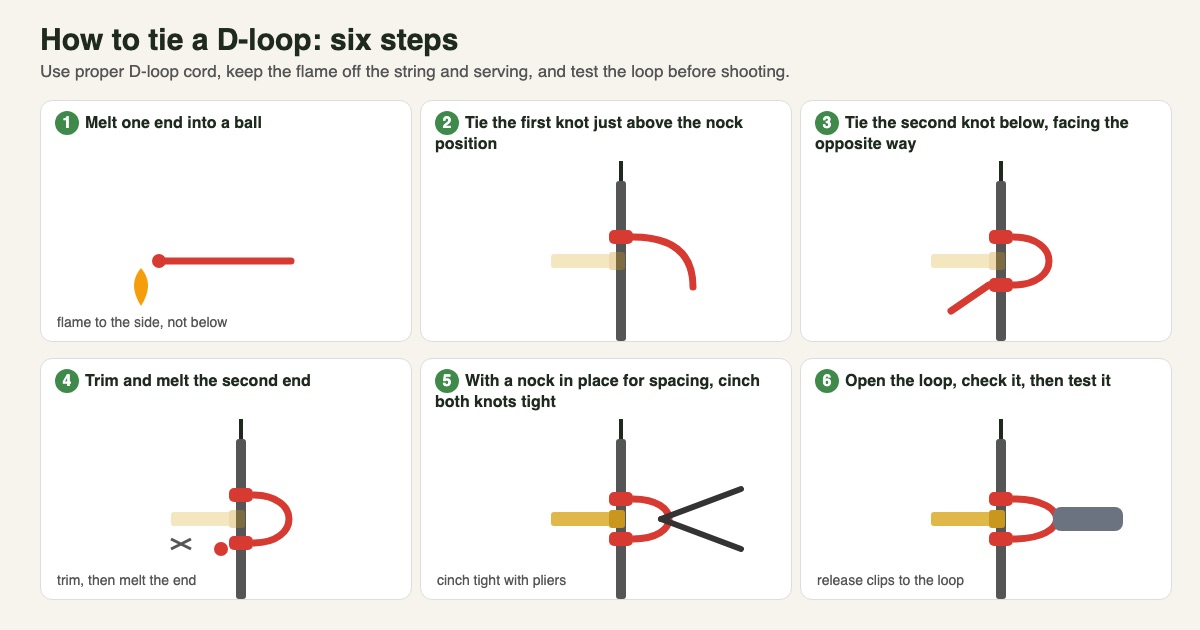
Lancaster and World Archery describe the same basic method, shown in our diagram above.
1. Melt one end
Hold the lighter so the flame is to the side of the cord end. Georgia 4-H is specific: "Do NOT place the flame below the material." Lancaster says to melt the end "until it shrinks down into a solid ball of melted material." World Archery suggests pressing the hot end gently flat to form "a mushroom shape" (don't touch molten cord with bare skin; use the side of the lighter or a tool). Georgia 4-H adds: "A properly melted end will not have any charring, ash, bubbles… If you have any of these defects, throw the loop away and start again."
2. Tie the first knot above the nock
Place the cord against the string just above where the arrow nock sits, with the melted end to one side. Tie the first knot around the string. Lancaster says to "pull the material tight so that your melted piece won't pull through the knot."
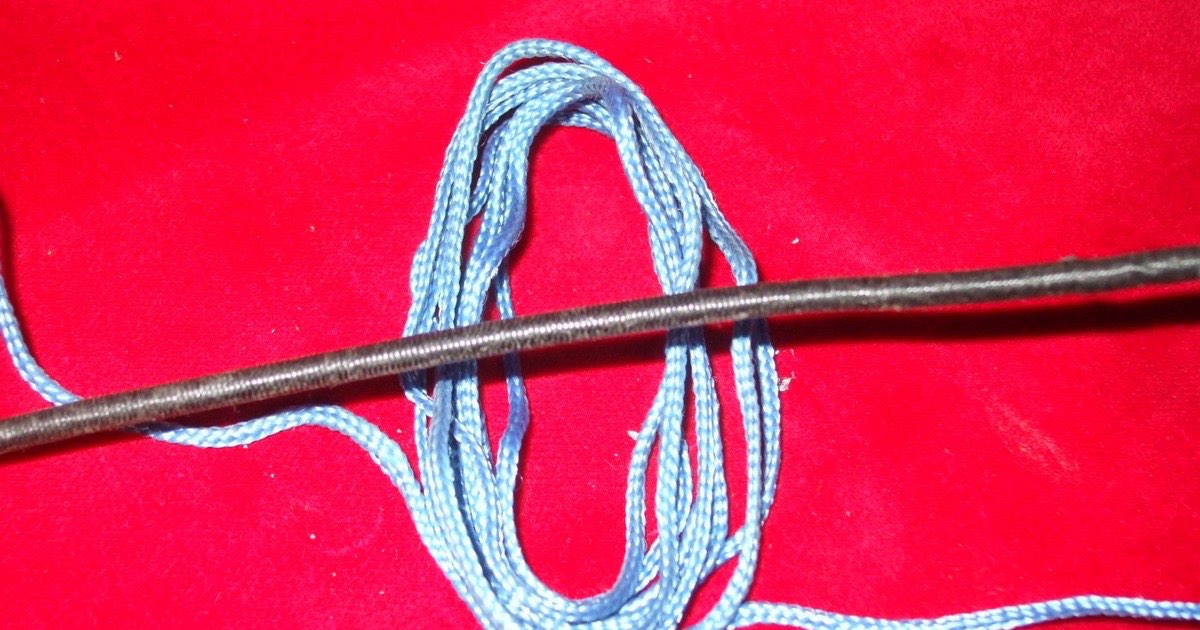
3. Tie the second knot below, on the opposite side
Bring the cord down past the nock position and tie a second knot below it, on the opposite side of the string. Lancaster explains that the knots facing away from each other is "a safety measure to ensure a tight knot and equal pulling."
4. Trim and melt the second end
Trim the excess cord, leaving enough to melt into a second ball, and melt it in the same way, with the flame to the side and away from the string and serving. Georgia 4-H aims for "between 4 and 4 1/2 inches BETWEEN the finished melted ends."
5. Set the spacing and cinch tight
Put an arrow nock on the string between the knots. World Archery suggests attaching "a (slightly bigger) nock to the string while you're securing it," so the arrow will not be pinched. Then use pliers to pull each knot tight. Georgia 4-H says the final cinch should be "TIGHT!"
6. Open the loop and check it
Open the loop with pliers so your release clips on easily. Check that the knots don't move on the serving, that the arrow nock fits between them without being pinched, and that the melted ends are solid. Then test it: draw the bow with an arrow, pointed at a target, and shoot a few arrows at close range before shooting further.
After your first session
Check the loop again after your first session with it. Look at whether the knots have moved on the serving, whether the loop has flattened or changed shape, and whether the arrow nock still fits between the knots without pinching. Give the knots another firm pull with the pliers if needed, and confirm your sight marks at your usual distances, because a new loop can shift your point of impact slightly.
Knotted and wrapped loops
The method above is the common knotted D-loop. Some archers and shops instead wrap a loop onto the string with serving-style turns. Both aim to do the same job; if you are unsure which suits your release and string, ask your pro shop.
How long should a D-loop be?
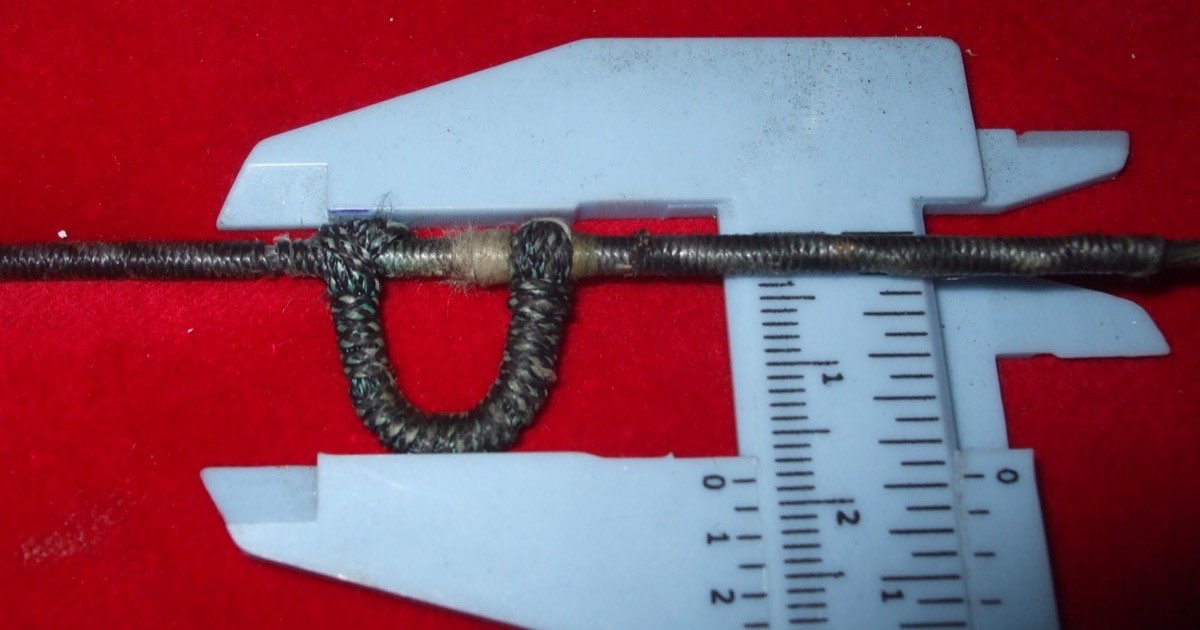
There is no single right length. Starting cord lengths from our sources range from about 4¼ inches to about 5 inches, depending on whether you use nock sets. The finished loop should be long enough for your release to clip on easily and short enough that it doesn't change your anchor or peep alignment. Many archers adjust the length over a couple of loops until it feels right.
Does a D-loop change draw length?
Not the bow's draw length. The industry (ATA) standard measures draw length from the nocking point on the string to the bow's grip pivot point, plus 1¾ inches, as our draw length guide explains. The D-loop doesn't change where the cams stop or where the nocking point sits.
What a D-loop does change is where your release hand ends up. A longer loop moves your hand forward and makes the draw feel shorter; a shorter loop moves it back and makes the draw feel longer. That changes your anchor and how the peep lines up with your eye. If your D-loop is very long or short, you may feel that your draw length is wrong when the bow is actually set correctly. A pro shop can help you balance draw length, release length and loop length.
D-loops and peep alignment
A new D-loop can change how the string sits at full draw, and so how the peep sight lines up. If the peep no longer sits square to your eye after a new loop, check the loop length and knot position first. Turning a peep normally means adding or removing twists in the string, which needs a bow press; see how a bow press works and our kisser button and peep sight guide.
Safety checks and when to replace a D-loop
- Check before every session for fraying, flattening, loose knots or a loop that has moved on the serving.
- Never draw a bow with a loose or damaged loop. A loop that fails at full draw can release the string with no arrow control.
- Replace it if it is frayed, if the knots have slipped, or when you replace the string. Many archers simply tie a fresh loop with every new string.
- Keep heat off the string and serving when melting the ends. Lancaster warns to be careful not to burn the bowstring.
If you are not confident, have a pro shop tie your first loop and watch how they do it. Our guide to how long bow strings last covers serving wear under the loop.
Common mistakes
- Using the wrong cord, such as general-purpose string, which may not hold or melt properly.
- Flame under the cord, which chars it and weakens the melted end.
- Charred or bubbly ends. Georgia 4-H says to throw the loop away and start again.
- Knots tied the same way, instead of facing away from each other.
- No nock in place while cinching, which can pinch the arrow nock.
- Not tightening enough, so the loop slides on the serving.
- Burning the serving or string with the lighter.
Tying your own D-loop
Advantages
- Quick and inexpensive
- Lets you fine-tune the loop length for your anchor
- Easy to replace when worn
Trade-offs
- Needs care with heat near the string
- A poorly tied loop can slip or fail
- May change peep alignment and feel
You can browse D-loop cord or D-loop pliers on Amazon.
Frequently asked questions
What is the best D-loop material?
Use cord sold for D-loops, such as braided polyester loop rope. It needs to hold a knot and melt cleanly.
How long should a D-loop be?
Start with about 4¼ to 5 inches of cord, depending on whether you use nock sets, and adjust until your release clips on easily without changing your anchor.
Does a D-loop change draw length?
It doesn't change the bow's draw-length setting, but a longer or shorter loop moves your hand and anchor, which changes how the draw feels.
Do I need nock sets with a D-loop?
Not always. Some archers use the loop's knots as the nocking point; others add internal nock sets and use a slightly longer cord.
How often should I replace my D-loop?
Replace it when it frays, flattens or slips, and usually whenever you replace the string.
Can I tie a D-loop without pliers?
It's hard to get the knots tight enough by hand. Pliers help you cinch them properly.
Why does my peep turn after tying a new D-loop?
The loop can change how the string sits at full draw. Check the loop first; turning the peep usually needs a bow press.
Related articles
 Gear
What Is a Release Aid? Types and How to Choose
What is a release aid? How index finger, thumb button, hinge and resistance releases work, who each suits, how to fit one, and the safest way to start using it.
October 16, 2026 · 10 min read
 Gear
Kisser Button and Peep Sight: What They Do, Where They Go
Kisser buttons and peep sights explained: what each does, where they go, how to install and tie in a peep, fixing peep rotation, and kisser vs nose button.
October 9, 2026 · 8 min read
 Training
Archery Draw Length: How to Measure It and Why It Matters
How to measure archery draw length with the wingspan method or at full draw, what the AMO standard means, and how it affects bow size, draw weight, and arrows.
Updated February 6, 2025 · 8 min read