
What Is a Release Aid? Types and How to Choose
What is a release aid? How index finger, thumb button, hinge and resistance releases work, who each suits, how to fit one, and the safest way to start using it.

By Archery Insider Editorial Team
· 10 min read
In this article
A release aid is a mechanical device that holds the bowstring at full draw and lets it go when you trigger it, instead of your fingers doing the job. Almost every compound bow archer uses one, from first-season bowhunters to World Cup champions. Missouri's conservation department puts the benefit simply: "A shooting release helps ensure that the string is released properly and consistently."
This guide explains why release aids exist, the four main types, who each one suits, how to fit and adjust one, and how to start shooting with one safely.
Why use a release aid?
Fingers are soft and the string has to roll off them. That small, inconsistent movement pushes the string sideways on every shot. A release aid holds the string at a single point with a metal jaw or hook and opens almost instantly, so the string leaves in the same way every time.
The benefits are:
- Consistency: the same clean release on every shot, which tightens groups.
- Comfort: no string pressure on your fingers, which matters with the higher draw weights of compound bows.
- A better anchor: the release lets you anchor in the same place on your jaw each time; our kisser button and peep sight guide explains how the two work together.
- Compound geometry: compound bows have short axle-to-axle lengths, which create a sharp string angle at full draw that pinches fingers. A release clipped to a D-loop avoids this.
Fingers are still the norm on recurves and longbows; our arm guard, finger tab and glove guide covers protection for finger shooters.
How a release aid attaches
Most compound archers tie a D-loop, a short loop of cord, onto the string above and below the nocking point. The release clips to the D-loop rather than directly to the string. This protects the string's serving from wear, keeps the release from pinching the arrow nock, and lets the string pull straight back behind the arrow. Some releases can clip directly to the string, but a D-loop is the standard setup today.
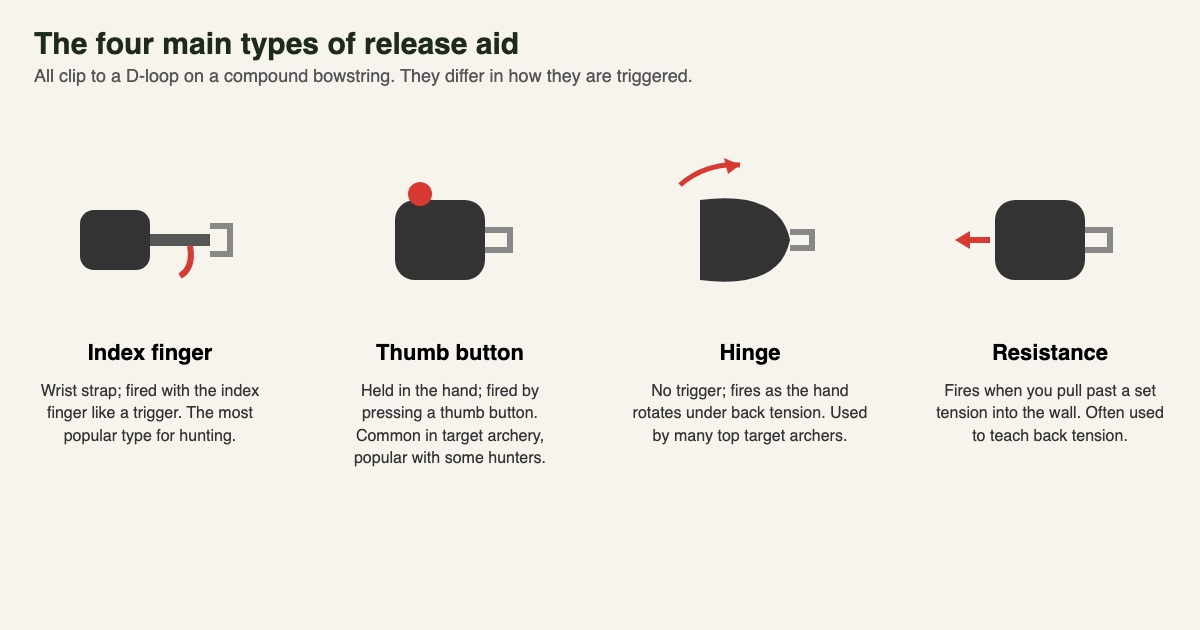
Release heads come in two main styles:
- Jaw (caliper) releases have one or two jaws that close around the loop and open when triggered. Dual-jaw heads are common on hunting releases.
- Hook releases use a single hook that the loop sits on; many hinge and thumb releases use a hook.
The four types of release aid
1. Index finger (wrist strap)
An index finger release straps around your wrist, with the head on a short stem in front of your hand. You draw the bow with the strap taking the load, anchor, and fire by squeezing a trigger with your index finger. Archery 360 describes it as "activated with the archer's index finger, much like the trigger on a firearm," and says the wrist strap lets the archer "hold full draw for a fairly long time without finger fatigue."
- Best for: hunters and beginners.
- Strengths: familiar trigger feel, the release stays on your wrist when you need your hands, easy to learn.
- Weaknesses: easier to develop a punching habit (slapping the trigger), which can lead to target panic.
Foldback straps, like the one on the TruFire Edge Buckle Foldback, let you fold the head back against your wrist while climbing, glassing or using your hands.
2. Thumb button (handheld)
A thumb release is held in the hand, with three or four fingers wrapped around the body, and fired by pressing a button with the thumb. Archery 360 notes they are "more widely used by target archers, but some hunters prefer them, too," and that holding the release gives "more contact between the back of their string hand and the face at the jawline, which allows for a more consistent anchor."
- Best for: target archers and hunters who want a more consistent anchor.
- Strengths: solid anchor, adjustable button tension and travel, a relaxed hand.
- Weaknesses: you must carry it separately (often on a lanyard or in a pocket), and it can be dropped in a tree stand.
3. Hinge (back tension)
A hinge release has no trigger. It fires when the handle rotates past a set point. The archer draws with a safety engaged (often by keeping a thumb or finger on a post), anchors, takes the safety off, then shifts pressure in the hand and pulls through with the back muscles until the release fires. Archery 360 says it "works with the rotation of the archer's string hand, which causes the release hook to let go," and that "most compound archers on World Cup and World Championship podiums shoot a variation of the back tension release."
- Best for: target archers and archers fighting target panic.
- Strengths: a surprise release that discourages flinching and punching.
- Weaknesses: a steep learning curve, and a misfire risk while learning. Not every hunter likes not knowing exactly when the shot will go.
4. Resistance (tension activated)
A resistance release fires when the pull on it reaches a set level. Archery 360 explains it "uses an internal mechanism that resists the tension of the bowstring until a certain point," that you "draw the bowstring back, disengage the safety lock, and pull into the wall of the cams," and that it "reinforces back tension with the archer because the only way to activate the resistance release is by pulling with your back muscles." It is often described as "a great tool for coaches to use to teach archers about true back tension."
- Best for: training and target archers.
- Strengths: teaches a strong, pulling shot.
- Weaknesses: must be set for your draw weight; less common for hunting.
Comparing the types
| Type | How it fires | Common users | Learning curve | Hunting suitability |
|---|---|---|---|---|
| Index finger | Trigger under index finger | Hunters, beginners | Easy | Excellent |
| Thumb button | Button under thumb | Target archers, some hunters | Moderate | Good |
| Hinge | Rotation of the hand | Target archers | Steep | Fair |
| Resistance | Pulling to a set tension | Training, target | Moderate | Limited |
Which release should you choose?
- First release, hunting: an index finger wrist-strap release is the simplest place to start.
- Target archery: many archers move to a thumb or hinge release once their form is consistent.
- Fighting target panic: a hinge or resistance release, with coaching, can help retrain a surprise shot.
- Cold weather or gloves: check you can feel and reach the trigger wearing the gloves you hunt in.
- Climbing or using your hands a lot: a foldback or buckle strap that keeps the release on your wrist.
Many experienced archers use an index release for hunting and a thumb or hinge release for target practice, and some practise with a hinge to keep their shot process honest.
How to fit and adjust a release aid
- Set the length. On a wrist-strap release, adjust the stem so the trigger sits on the first joint or pad of your index finger with your hand relaxed at full draw. Too long and you reach; too short and you may fire early.
- Set the trigger tension and travel. Many releases let you adjust how hard and how far the trigger moves. A beginner often prefers a firmer trigger to avoid accidental release.
- Check your anchor. The release changes where your hand sits on your face. Adjust the length until your anchor and peep alignment feel natural.
- Re-check draw length. A long or short release effectively changes how far back your hand ends up. If you switch to a much longer or shorter release, a shop may suggest adjusting the bow's draw length.
- Check the D-loop. The loop should be long enough for the release to clip on easily, but short enough that it does not change your anchor or peep alignment.
How to start shooting with a release safely
- Start close: shoot at a large target or blank bale at a few yards until the motion is automatic.
- Keep your finger behind the trigger while drawing. Wrap it around the trigger only once at anchor.
- Draw with the bow pointed at the target, never upward. An accidental release while skylining can send an arrow anywhere.
- Squeeze, do not punch. Archery 360 describes the index release as fired by "slowly squeezing the trigger with the index finger." Aim, let the pin float, and increase pressure until the shot surprises you.
- Never dry fire. If the release misfires without an arrow, inspect the bow before shooting again.
- Check the release regularly for wear, loose screws and a smooth trigger.
Release aids for bowhunting
Hunting puts different demands on a release than the range does. You may sit for hours, draw in cold weather with numb fingers, climb into a stand, and need to shoot quickly when an animal steps out. A few practical points:
- Keep it attached. A wrist strap means the release is always on your hand when the moment comes. With a handheld release, use a lanyard or a dedicated pocket.
- Quiet operation. Clipping on and opening the jaws should make as little noise as possible. Practise clipping on by feel without looking down.
- Clip on early. Many hunters clip onto the D-loop as an animal approaches so they only need to draw, not fumble with the release.
- Practise in hunting clothes. Bulky sleeves and gloves can change how the release sits on your wrist and where your anchor lands.
- Carry a spare. A lost or broken release can end a hunt, and a spare weighs very little.
Release aid problems and fixes
| Problem | Likely cause | Fix |
|---|---|---|
| Shooting before you are ready | Trigger too light or finger on trigger while drawing | Increase tension; keep the finger behind the trigger |
| Punching or flinching | Anticipating the shot | Practice squeezing on a blank bale; try a hinge with coaching |
| Hand slapping the face | Release too short or anchor too tight | Lengthen the release or adjust the anchor |
| Peep not lining up | Release length changed anchor | Re-set length or move the peep |
| Release opens slowly or sticks | Dirt or wear | Clean and inspect; replace if worn |
Common mistakes
- Buying a release that does not fit your hand. Try several at a shop.
- Setting the trigger too light before your shot process is reliable.
- Learning on a target face at distance and focusing on the bull's-eye instead of the shot process.
- Hunting with a release you have not practised with in hunting clothes and gloves.
- Losing the release in the field. Keep a spare in your pack for hunting.
Using a release aid
Advantages
- Cleaner, more consistent release than fingers
- Comfortable with higher compound draw weights
- Helps a consistent anchor and peep alignment
- Several types to suit hunting or target archery
Trade-offs
- Another piece of gear to buy, fit and carry
- Can encourage punching if used badly
- Hinge releases take time and coaching to learn
You can browse wrist-strap release aids or thumb release aids on Amazon.
Frequently asked questions
What is a release aid in archery?
A mechanical device that holds the bowstring at full draw and lets it go when triggered, giving a cleaner, more consistent release than fingers.
Do I need a release aid for a compound bow?
Most compound archers use one, and most compound setups are designed around a release and D-loop, though some bows can be shot with fingers.
Which release is best for beginners?
An index finger wrist-strap release is usually the easiest to learn and the most common choice for hunters.
What is a hinge release?
A release with no trigger that fires when the hand rotates past a set point, giving a surprise shot. It is popular with target archers.
Can I use a release aid on a recurve?
Not in most recurve target competitions, which require finger shooting. Some recreational archers do, but recurves are designed for fingers.
How do I stop punching the trigger?
Practise on a blank bale at close range, wrap the finger around the trigger only at anchor, and increase pressure slowly while aiming so the shot surprises you. A coach or a hinge release can help retrain the habit.
How long should a D-loop be?
Long enough to clip onto easily and short enough that it does not change your anchor or peep alignment. A shop can tie one to suit your release.
Related articles
 Reviews
TruFire Edge Buckle Foldback Review: A Sensible First Release Aid
Research-based TruFire Edge Buckle Foldback review: caliper jaws, adjustable trigger travel and length, 360-degree head rotation, 4.8 oz, and who it suits.
July 8, 2026 · 4 min read
 Gear
Kisser Button and Peep Sight: What They Do, Where They Go
Kisser buttons and peep sights explained: what each does, where they go, how to install and tie in a peep, fixing peep rotation, and kisser vs nose button.
October 9, 2026 · 8 min read
 Training
Target Panic in Archery: Symptoms, Causes and How to Fix It
Target panic explained: symptoms like freezing off target and snap shooting, what causes it, a self-test, and a step-by-step recovery plan for any bow.
February 19, 2025 · 8 min read