
How to Set Centre Shot on a Bow
How should an arrow sit on a rest? Set centre shot by sighting down the string: just outside it on a recurve, in line on a compound, then confirm by shooting.
By Archery Insider Editorial Team
· · 5 min read
In this article
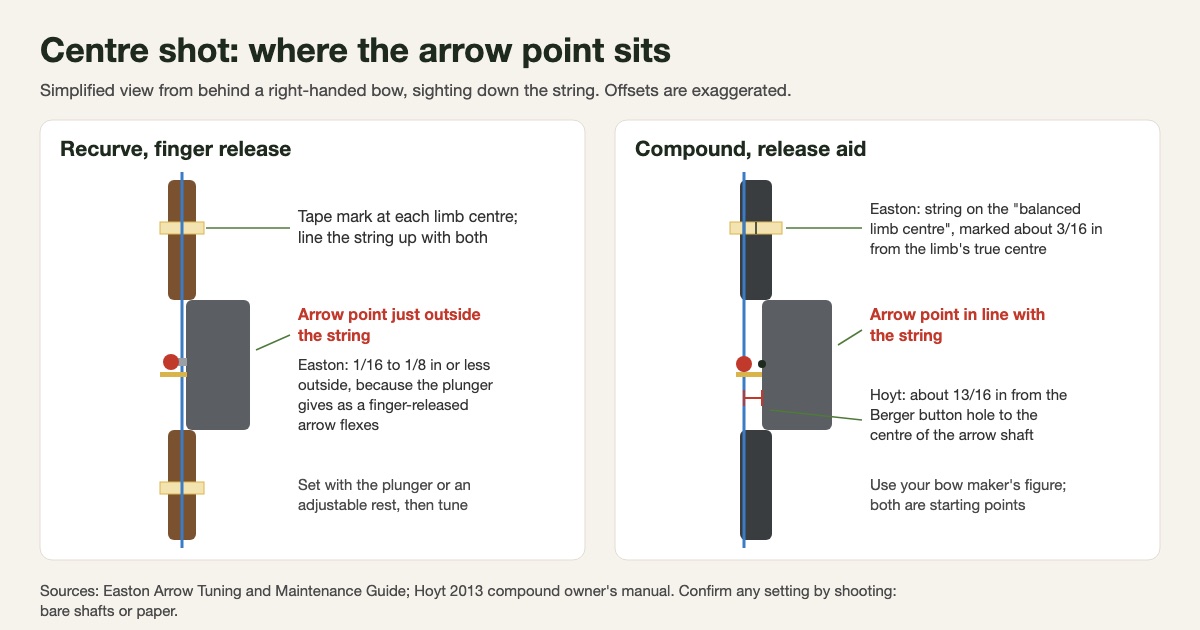
Centre shot is the arrow's left-right position on the bow, and it answers how an arrow should sit on a rest. On a finger-shot recurve, start with the arrow point just outside the string when the string lines up with the limb centres. On a compound shot with a release aid, start with the point in line with the string or at your maker's measurement, then confirm by shooting.
Step 1: Find the limb centres and sight down the string
You need a reference before you can judge the arrow. Easton's guide says to "place a piece of masking tape across the inside of each limb a few inches from the riser" and mark the exact centre of each limb.
Compounds need one extra step. Easton marks the true centre, then a second mark 3/16 in to the left for a right-handed archer (right for a left-hander). This "balanced limb center" is an average allowance for the cam's offset, and Easton says it "does not need to be a precise measurement" at this stage.
Stand behind the bow, held upright or in a bow vice, and close one eye. Move your head until the string runs through both tape marks, then see where the point of a nocked arrow sits against the string.
Step 2: Recurve, point just outside the string
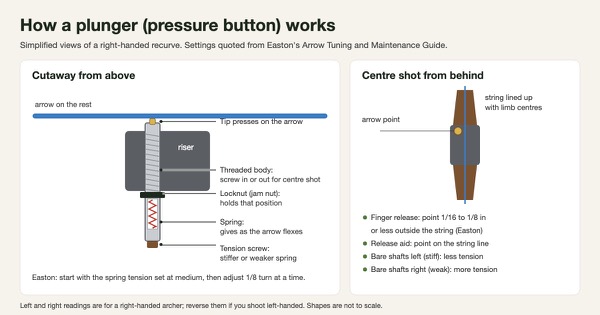
For finger shooters, Easton puts the point slightly outside the string, away from the riser, to allow for the plunger compressing as the arrow flexes. Our plunger guide gives Easton's exact figure and how to adjust the plunger. As Archery 360 puts it, "plungers can be adjusted left or right of center to ensure the arrow is 'center shot.'"
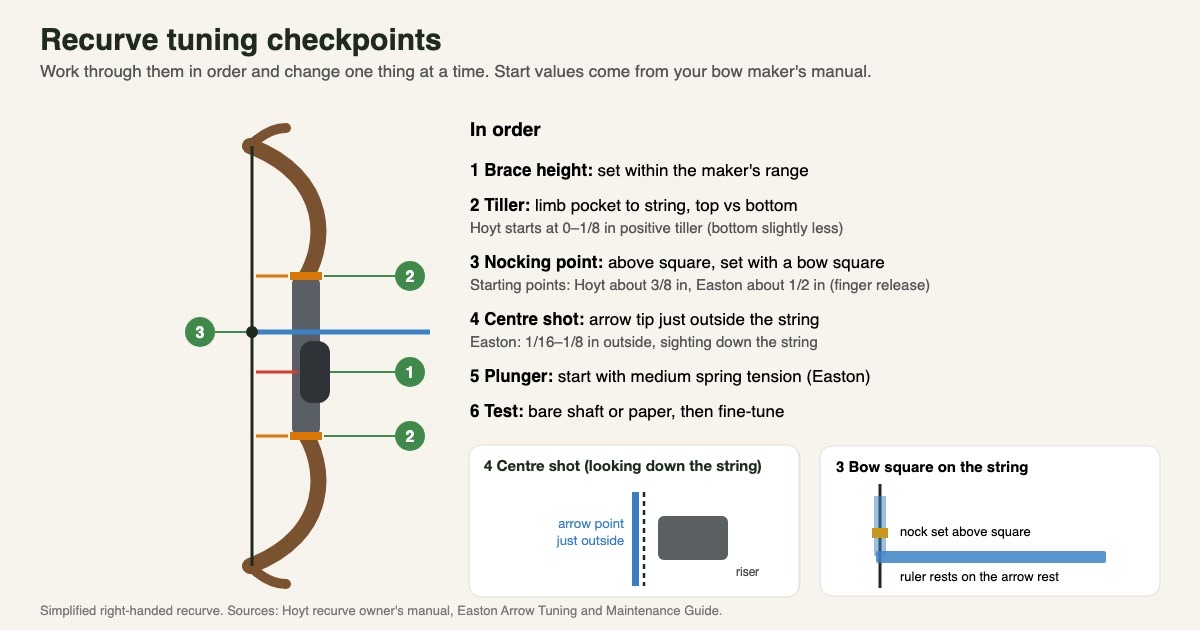
Not every source agrees on the start: you'll also see the point lined up directly behind the string. Treat any of them as a starting point and let your arrows decide.
Shooting off the shelf or a simple stick-on rest gives no in-out adjustment: as Easton notes, "not every type of bow setup uses a cushion plunger." There, the riser sets centre shot.
Step 3: Compound, use the maker's figure
With a release aid, Easton says to "align the 'tip' of the arrow point down the center of the bowstring," with the string lined up on the balanced limb centre. A release makes the arrow bend mostly up and down, so there's nothing to compensate for. Compound finger shooters follow the recurve rule.
Many makers give a measurement instead. Hoyt's 2013 compound manual says: "The measurement from the Berger button hole to the center of the arrow shaft should be approximately 13/16"." Our drop-away rest guide covers mounting the rest before you set it.
| Setup | Starting position | Source |
|---|---|---|
| Recurve, finger release | Point slightly outside the string | Easton |
| Compound, finger release | Point slightly outside the string | Easton |
| Compound, release aid | Point down the centre of the string | Easton |
| Compound, maker's spec | About 13/16 in, Berger hole to shaft centre | Hoyt (2013 manual) |
| Shelf or fixed rest | Set by the riser; not adjustable | Easton |
Step 4: Confirm by shooting
Your eye only gets you close. Our paper tuning guide shows how to read left and right tears.
Easton's short-distance method goes finer. Shoot 6 to 8 arrows in a vertical line at the left edge of the paper. Compound archers then move the rest 1/32 in at a time, reversing if the line widens. Easton explains that the cam can lean at full draw, so your starting centre "may not really be the true balanced center."
Recurve finger shooters are told the opposite: "Do not move the in/out position of your arrow!" Once centre shot is set, Easton has them adjust only plunger spring tension, 1/8 turn at a time.
A measurement like Hoyt's is easier to repeat with a gauge. You can browse bow squares and centre-shot gauges on Amazon; treat any listing as an example to consider.
Frequently asked questions
How should an arrow sit on a rest?
Seen from behind, with the string lined up on the limb centres, a finger-shot recurve arrow starts with its point just outside the string. A compound arrow shot with a release starts in line with it. Confirm either position with paper or bare shafts.
Is centre shot the same on every compound?
No. Easton lines the arrow up with the string on the balanced limb centre, while Hoyt's 2013 manual gives about 13/16 in from the Berger button hole to the shaft's centre. Start from your own bow maker's figure, then fine-tune by shooting.
Related articles
 Training
Paper Tuning a Bow: How to Read Tears and Fix Them
How to paper tune a bow: what it shows, frame setup, reading nock-high, low, left and right tears, the order of fixes, and when to see a pro shop.
October 8, 2026 · 10 min read
 Gear
GearWhat Is a Plunger (Pressure Button)?
Archery: what is a plunger? How a recurve bow plunger sets centre shot and cushions the arrow, what spring tension does, and plunger vs arrow rest.
Updated October 8, 2026 · 4 min read
 Training
How to Install Brass and Tied Nock Points
Recurve bow nocking point height and how to fit one: find square with a bow square, crimp a brass nock set or tie one on, then fine-tune by shooting.
Updated October 8, 2026 · 5 min read